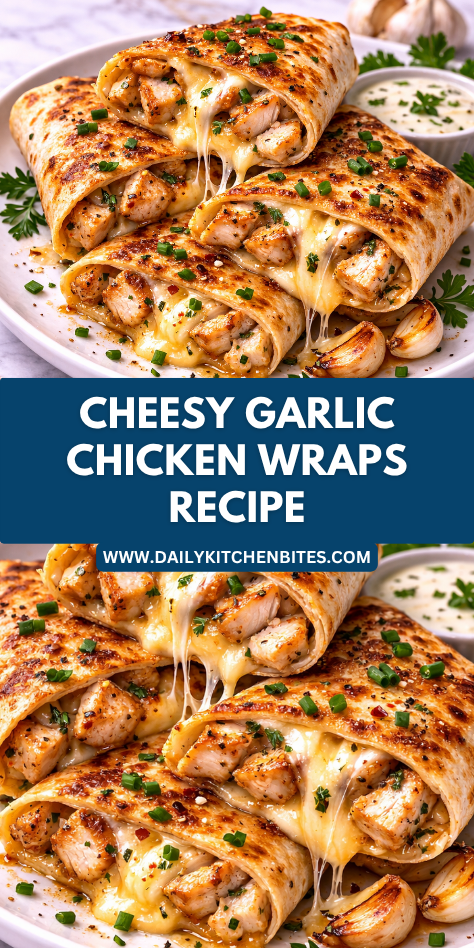
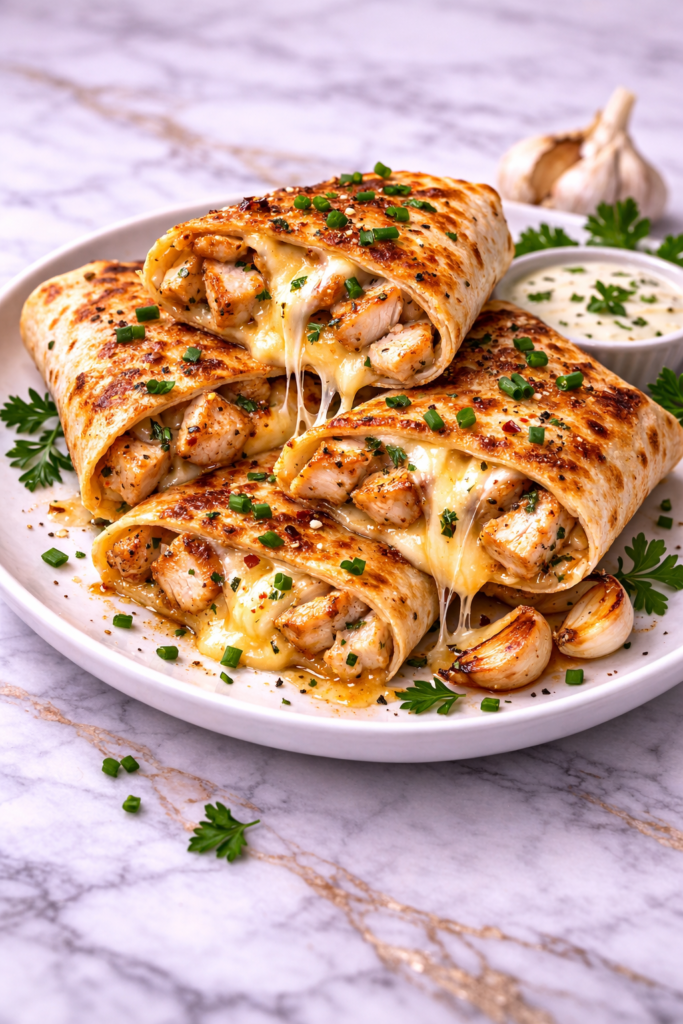
Some meals become instant favorites because they are quick to make, full of flavor, and easy to serve. Cheesy Garlic Chicken Wraps earned that spot in our home because they combine juicy chicken, melted cheese, and warm garlicky flavor all wrapped in a golden toasted tortilla.
I first started making these wraps on busy evenings when everyone wanted dinner fast but still homemade. They quickly became a regular request because they feel comforting, cook quickly, and are easy to customize for different tastes around the table.
Why You’ll Love This Recipe
This recipe brings together everything people love in an easy handheld dinner. Tender seasoned chicken, gooey melted cheese, and buttery garlic flavor make every bite warm, savory, and satisfying.
It is also wonderfully practical for busy households. The ingredients are simple, the cooking steps are easy, and dinner can be on the table in about 30 minutes.
Families love how flexible these wraps are. Add vegetables, use different cheeses, or make them mild or spicy depending on what everyone enjoys most.
Serves: 4 people
This recipe makes four generous wraps, depending on tortilla size and how full you make them. It can easily be doubled for larger families or meal prep.
Ingredients You’ll Need
For the Chicken Filling
- 1 1/2 pounds boneless skinless chicken breasts or thighs, diced
- 1 tablespoon olive oil
- 1 teaspoon salt
- 1/2 teaspoon black pepper
- 1 teaspoon garlic powder
- 1 teaspoon onion powder
- 1 teaspoon paprika
- 1/2 teaspoon Italian seasoning
For the Wraps
- 4 large flour tortillas
- 2 cups shredded mozzarella cheese
- 1 cup shredded cheddar cheese
- 1/2 cup cream cheese, softened
- 1/4 cup cooked bacon bits (optional)
- 1 cup baby spinach or chopped lettuce (optional)
- 1/2 cup diced tomatoes (optional)
For the Garlic Butter
- 3 tablespoons butter, melted
- 2 cloves garlic, minced
- 1 tablespoon chopped parsley
- 1/4 teaspoon salt
Optional Dipping Sauces
- Ranch dressing
- Garlic aioli
- Honey mustard
- Marinara sauce
If using chicken thighs, trim excess fat before dicing. Chicken thighs stay juicy and flavorful, while chicken breasts give a leaner option.
Pro Tips
Cut the chicken into small even pieces so it cooks quickly and fits neatly inside the wraps. Even pieces also make every bite easier to eat.
Soften the cream cheese before mixing or spreading. This helps it blend smoothly and evenly inside the tortillas.
Do not overfill the wraps. Keeping the filling moderate makes rolling easier and helps the tortillas stay closed while toasting.
Warm tortillas briefly before assembling if they feel stiff. Warm tortillas fold more easily and are less likely to crack.
Toast the wraps seam-side down first. This helps seal them naturally as the cheese melts inside.
For families with younger children, keep one or two wraps plain with just chicken and cheese. Simple versions are often the most popular.
Tools You’ll Need
- Large skillet or grill pan
- Cutting board
- Sharp knife
- Mixing bowls
- Measuring cups
- Measuring spoons
- Spatula or tongs
- Small bowl for garlic butter
- Pastry brush or spoon
- Plate or cutting board for serving
A large nonstick skillet works especially well for toasting the wraps evenly. It also helps create a crisp golden exterior without sticking.
Substitutions and Variations
Use rotisserie chicken instead of cooking raw chicken for an even faster version. Simply shred and season lightly before using.
Swap mozzarella and cheddar for Monterey Jack, provolone, pepper jack, or Colby cheese. Different cheeses change the flavor while keeping the wraps deliciously melty.
Use whole wheat tortillas, spinach wraps, or gluten-free tortillas if preferred. Choose sturdy tortillas that can hold the filling well.
Turkey, steak, or cooked shrimp can replace chicken for a fun variation. The garlic butter pairs well with many proteins.
Add sautéed onions, mushrooms, or bell peppers for extra flavor and texture. Cook vegetables first so they do not release too much moisture inside the wraps.
For a spicy version, add sliced jalapeños, hot sauce, or crushed red pepper flakes. Pepper jack cheese also adds a nice kick.
If you prefer a lighter wrap, skip the cream cheese and use extra greens or sliced avocado instead.
For a breakfast-style version, add scrambled eggs with the chicken and cheese. This makes a hearty morning meal.
Use Caesar dressing and Parmesan for a garlicky Caesar-inspired twist. It is a great way to change the flavor profile.
You can also turn the filling into quesadillas instead of wraps if that is easier for serving younger children.
Make Ahead Tips
This recipe is perfect for planning ahead on busy days. Dice and season the chicken up to 24 hours in advance, then keep it covered in the refrigerator until ready to cook.
You can also cook the chicken filling earlier in the day and store it chilled. Warm it slightly before assembling the wraps so the cheese melts more easily.
Shred the cheese and mix the garlic butter ahead of time for faster dinner prep. Keeping everything ready makes these wraps come together quickly.
If meal prepping lunches, fully assemble the wraps and refrigerate them un-toasted. Toast just before serving for the best texture.
Instructions
Step 1: Prepare the Chicken
Place the diced chicken in a bowl. Add olive oil, salt, black pepper, garlic powder, onion powder, paprika, and Italian seasoning.
Toss until all pieces are evenly coated. Seasoning first helps every bite taste flavorful and well balanced.
Step 2: Cook the Chicken
Heat a large skillet over medium-high heat. Add the seasoned chicken in a single layer.
Cook for 6 to 8 minutes, stirring occasionally, until the chicken is golden and fully cooked to 165°F. Transfer to a plate and set aside.
Step 3: Make the Garlic Butter
In a small bowl, combine the melted butter, minced garlic, chopped parsley, and salt. Stir well until evenly mixed.
This garlic butter adds wonderful flavor and helps the tortillas toast beautifully. Set it nearby for assembly.
Step 4: Prepare the Tortillas
Lay the tortillas flat on a clean surface. If they feel stiff, warm them for a few seconds in the microwave or skillet so they fold easily.
Spread about 2 tablespoons softened cream cheese onto the center of each tortilla. This creates a creamy layer that pairs beautifully with the chicken.
Step 5: Add the Filling
Divide the cooked chicken evenly among the tortillas. Sprinkle mozzarella and cheddar cheese over the chicken.
Add bacon bits, spinach, or diced tomatoes if using. Keep the filling centered and avoid overfilling.
Step 6: Fold the Wraps
Fold the sides of each tortilla inward, then roll tightly from the bottom up to form secure wraps.
Place each wrap seam-side down on a plate while finishing the rest. This helps them stay closed.
Step 7: Toast the Wraps
Heat the skillet over medium heat. Brush the outside of each wrap lightly with garlic butter.
Place the wraps seam-side down in the skillet and cook for 2 to 3 minutes per side until golden brown and crisp. Turn carefully and toast all sides if desired.
Step 8: Melt and Finish
Continue cooking until the cheese inside is melted and the wraps are heated through. Reduce the heat if the outside browns too quickly.
Brush with a little extra garlic butter right after cooking for even more flavor if desired.
Step 9: Slice and Serve
Transfer the wraps to a cutting board and let them rest for 1 minute. Slice in half diagonally for easy serving.
Serve warm with your favorite dipping sauces on the side.
Serving Suggestions
Serve these wraps with crispy oven fries, potato wedges, or sweet potato fries for a classic family-friendly dinner. The crunchy sides pair perfectly with the melty filling.
Add a green salad or fresh fruit for a lighter balance. This works especially well for lunch or warm-weather meals.
Pair with tomato soup or creamy vegetable soup for a cozy dinner combination. The toasted wraps are wonderful for dipping.
Serve with ranch dressing, garlic aioli, honey mustard, or marinara sauce so everyone can choose a favorite dip.
Cut wraps into smaller pieces for party platters, game nights, or after-school snacks. They are easy to share and always popular.
Use leftovers sliced into pinwheels for quick lunches the next day. They pack well and taste great reheated or cold.
Leftovers and Storage
Allow leftover wraps to cool slightly before storing. Wrap tightly in foil or place in an airtight container and refrigerate for up to 3 days.
To reheat, warm them in a skillet over medium-low heat until crisp again and heated through. This keeps the tortilla much nicer than microwaving alone.
You can also use an air fryer at 350°F for a few minutes. This restores a crisp outside very quickly.
For freezing, wrap cooled uncut wraps individually and freeze for up to 2 months. Thaw overnight in the refrigerator before reheating.
Nutrition and Benefits
- Chicken provides protein that helps make these wraps filling and satisfying.
- Cheese adds calcium, rich flavor, and the melty texture families love.
- Homemade wraps allow you to control ingredients and seasoning levels.
- Optional vegetables like spinach and tomatoes add freshness and color.
- Handheld meals are practical for busy evenings and easy family dinners.
- The recipe is flexible and works with many cheeses, sauces, and add-ins.
Recipe FAQ
Can I use rotisserie chicken?
Yes, rotisserie chicken is an excellent shortcut. Simply shred it, season lightly, and warm it before assembling the wraps.
What cheese melts best for these wraps?
Mozzarella, Monterey Jack, cheddar, provolone, and Colby all melt very well. Mixing cheeses gives great flavor and texture.
How do I keep wraps from falling apart?
Do not overfill them and roll tightly. Toasting seam-side down first also helps seal them closed.
Can I make these gluten-free?
Yes, use sturdy gluten-free tortillas. Warm them first so they fold more easily without cracking.
Can I bake these instead of pan-toasting?
Yes, bake at 400°F until golden and heated through, turning once if desired. Brush with garlic butter before baking.
What vegetables work best inside?
Spinach, sautéed onions, bell peppers, mushrooms, and tomatoes are all great choices. Avoid adding watery vegetables raw in large amounts.
Are these good for meal prep?
Yes, they are excellent for meal prep. Assemble ahead and toast fresh, or fully cook and reheat later.
Conclusion
A Cheesy Weeknight Favorite Worth Making Again
These Cheesy Garlic Chicken Wraps are the kind of dependable meal that makes dinner feel easy and satisfying. They use simple ingredients, quick steps, and deliver warm chicken, melted cheese, and golden garlic flavor every time.
They are worth making again because they fit busy weeknights, family lunches, and casual dinners so naturally. With reliable results, comforting flavor, and easy customization, this is a recipe families happily return to again and again.