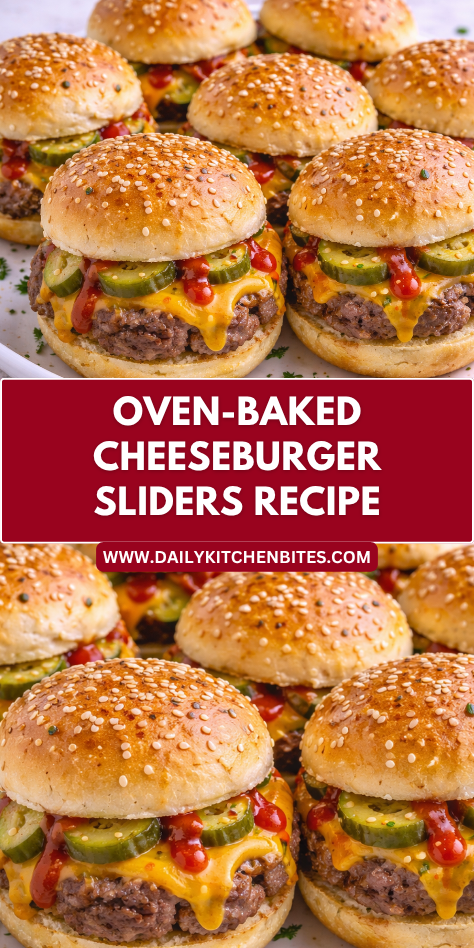
Some dinners have a way of making everyone gather around the kitchen a little faster, and Oven-Baked Cheeseburger Sliders always do that in my home. The smell of seasoned beef, melted cheese, and warm buttery rolls coming from the oven is enough to bring people to the table before I even call them. They feel fun, comforting, and perfect for sharing.
I love this recipe because it gives all the flavor of cheeseburgers without standing at the stove flipping patties. Everything bakes together in one pan, which makes dinner easier and cleanup simpler. Whether I am serving a family meal, casual party, or game day spread, these sliders are always a dependable favorite.
Why You’ll Love This Recipe
Oven-Baked Cheeseburger Sliders are packed with classic cheeseburger flavor in an easy, crowd-friendly format. Savory beef, melty cheese, soft rolls, and buttery tops create a warm, satisfying bite every time. They feel special while using simple everyday ingredients.
This recipe is especially practical for busy households because it comes together quickly and bakes in one dish. Instead of cooking individual burgers, you prepare one seasoned beef layer and slice the sliders after baking. That saves time and makes serving easy.
Another reason to love these sliders is how flexible they are. Add pickles, bacon, onions, or different cheeses to match your family’s tastes. They work equally well for dinner, parties, lunches, or weekend gatherings.
Serves: 6 people
This recipe makes 12 sliders, which comfortably serves six people with two sliders each. For bigger appetites or party platters, doubling the recipe in two pans works very well.
Ingredients You’ll Need
For the Sliders
- 1 tablespoon olive oil
- 1 pound ground beef
- 1 small yellow onion, finely diced
- 2 cloves garlic, minced
- 1 teaspoon kosher salt
- 1/2 teaspoon black pepper
- 1 teaspoon Worcestershire sauce
- 12 slider rolls or Hawaiian rolls, kept connected
- 6 slices cheddar cheese, halved
- 6 slices American cheese, halved
For the Butter Topping
- 3 tablespoons unsalted butter, melted
- 1 teaspoon sesame seeds
- 1/2 teaspoon garlic powder
- 1/2 teaspoon dried parsley
Optional Toppings for Serving
- Dill pickle slices
- Ketchup
- Mustard
- Burger sauce
- Lettuce
- Tomato slices
- Crispy bacon
Pro Tips
- Cook the beef until fully browned and crumbly, then drain excess grease if needed. This keeps the sliders flavorful without making the rolls soggy.
- Keep the rolls connected when slicing them in half horizontally. This makes assembly faster and helps the sliders hold together while baking.
- Layer cheese on both sides of the beef filling if possible. Cheese above and below the meat helps keep the bread from absorbing too much moisture.
- Cover the pan with foil for the first part of baking. This helps the cheese melt thoroughly before the tops brown too quickly.
- Let the sliders rest for 5 minutes before slicing. This helps the cheese settle and makes cleaner portions.
- Serve sauces and toppings on the side when feeding families. Everyone can customize their sliders without extra prep during baking.
Tools You’ll Need
- Large skillet
- Wooden spoon or spatula
- Cutting board
- Sharp knife
- Measuring spoons
- Measuring cup
- 9×13-inch baking dish or sheet pan
- Pastry brush
- Aluminum foil
- Spatula for serving
Substitutions and Variations
Ground beef gives classic cheeseburger flavor, but ground turkey or ground chicken can be used for a lighter option. If using leaner meats, consider adding a little extra Worcestershire sauce or onion for moisture and flavor.
Cheddar and American cheese melt beautifully, though Swiss, provolone, Monterey Jack, or pepper jack also work well. Mixing two cheeses often gives the best balance of flavor and texture.
Slider rolls or Hawaiian rolls are both excellent choices. Hawaiian rolls add a touch of sweetness, while classic savory slider buns create a more traditional burger taste.
For extra flavor, sauté mushrooms with the onions and add them to the beef mixture. This creates a richer filling and stretches the meat further.
If your family loves bacon cheeseburgers, add cooked chopped bacon between the beef and cheese layers. It adds crunch and smoky flavor that pairs perfectly with the sliders.
Pickles can be layered inside the sliders or served on the side. If placing them inside, pat them dry first so the bread stays soft rather than soggy.
For a sauce variation, spread burger sauce, ketchup, mustard, or mayonnaise on the buns before assembling. This can make the sliders taste even more like your favorite diner burger.
To add vegetables, include finely diced bell peppers, sautéed onions, or shredded lettuce after baking. Fresh toppings add color and texture.
For spicy sliders, use pepper jack cheese, jalapeños, or a drizzle of hot sauce. A little heat works nicely with the rich beef and soft bread.
If you need a lower-carb option, serve the filling in lettuce cups instead of rolls. You still get all the cheeseburger flavor in a lighter format.
For gluten-free needs, use gluten-free slider buns or dinner rolls. Check sauces and seasonings as well if needed.
Mini turkey sliders are a great variation for meal prep lunches. They reheat well and make easy portions for the week.
You can also make breakfast sliders by adding scrambled eggs and bacon to the cheeseburger filling style. It is a creative twist for brunch gatherings.
To keep the recipe budget-friendly, use store-brand rolls and whichever cheese is on sale. The overall flavor still turns out delicious.
These sliders are ideal for entertaining because they scale easily. Simply prepare multiple pans and bake them side by side if your oven space allows.
No matter how you customize them, the buttery baked tops and melted cheese are what make these sliders especially memorable.

Make Ahead Tips
Oven-Baked Cheeseburger Sliders are excellent for planning ahead, especially when serving guests or feeding a busy family. You can cook the beef mixture up to one day in advance, let it cool, and store it covered in the refrigerator. This turns assembly into a quick task when dinner time arrives.
The butter topping can also be mixed earlier and kept in a small container at room temperature for a few hours or refrigerated longer. Warm it briefly if the butter firms up before brushing it over the rolls.
You may fully assemble the sliders a few hours before baking. Cover the pan tightly and refrigerate, then bake when ready to serve.
For the best bread texture, bake fresh rather than reheating fully assembled uncooked sliders after a full day. Fresh baking keeps the rolls soft inside with golden tops.
Instructions
Step 1: Preheat the Oven
Preheat your oven to 350°F. Lightly grease a 9×13-inch baking dish or line a sheet pan with parchment paper.
Step 2: Cook the Beef
Heat the olive oil in a large skillet over medium heat. Add the diced onion and cook for 3 to 4 minutes until softened.
Step 3: Brown the Meat
Add the ground beef and break it apart with a spoon. Cook until browned and fully cooked, about 6 to 8 minutes, then drain excess grease if needed.
Step 4: Season the Filling
Stir in the garlic, salt, black pepper, and Worcestershire sauce. Cook for 1 minute more until fragrant, then remove from the heat.
Step 5: Prepare the Rolls
Keeping the rolls connected, slice the entire slab horizontally through the middle. Place the bottom half into the prepared baking dish.
Step 6: Layer the Cheese and Beef
Arrange half of the cheese slices over the bottom rolls. Spread the warm beef mixture evenly over the cheese, then top with the remaining cheese slices.
Step 7: Add the Tops
Place the top half of the rolls over the filling. Press gently so everything sits evenly in the pan.
Step 8: Make the Butter Topping
In a small bowl, combine the melted butter, sesame seeds, garlic powder, and dried parsley. Brush the mixture generously over the tops of the rolls.
Step 9: Bake Covered
Cover the dish loosely with foil and bake for 15 minutes. This helps the cheese melt fully while keeping the tops from browning too fast.
Step 10: Finish Baking
Remove the foil and bake another 5 to 10 minutes until the tops are golden and the sliders are hot throughout.
Step 11: Rest and Slice
Let the sliders rest for 5 minutes before slicing along the roll lines. Serve warm with your favorite toppings and sauces.
Serving Suggestions
Oven-Baked Cheeseburger Sliders are perfect with crispy oven fries or classic French fries. The combination feels like a fun diner-style meal at home.
Serve them with a green salad or coleslaw for a lighter balance. Fresh sides pair nicely with the rich beef and melted cheese.
For parties, place sliders on a platter with bowls of ketchup, mustard, and burger sauce. This makes serving simple and easy to customize.
Pickles on the side add crunch and tang that complement the savory filling. They are especially popular with classic burger lovers.
These sliders also pair well with baked beans or macaroni salad. Both sides make the meal feel casual and satisfying.
For game day gatherings, serve with chips, vegetable trays, and dipping sauces. They fit naturally into a relaxed snack-style spread.
Leftovers and Storage
Allow leftover sliders to cool before storing them in an airtight container. Refrigerate for up to 3 days for the best quality.
Reheat in a 325°F oven for 10 to 15 minutes, loosely covered with foil. This helps warm the filling while keeping the bread from becoming too firm.
For faster reheating, microwave individual sliders in short intervals. The bread may soften more, but the flavor remains delicious.
If storing multiple sliders, place parchment paper between layers if needed. This can help prevent sticking.
Freezing is possible after baking. Wrap individual sliders tightly and freeze for up to 2 months, then thaw overnight in the refrigerator before reheating.
Nutrition and Benefits
- Ground beef provides protein that helps make the meal filling and satisfying.
- Homemade sliders allow control over ingredients, seasonings, and portion sizes.
- Baking multiple sliders at once is efficient and reduces stovetop cooking time.
- Serving with vegetables or salad helps create a balanced family meal.
- Cheese adds calcium and rich flavor that many families enjoy.
- Smaller slider portions make it easier to serve children or mixed appetites.
Recipe FAQ
Can I use Hawaiian rolls for this recipe?
Yes, Hawaiian rolls are one of the most popular choices. Their soft texture and slight sweetness pair very well with savory beef and cheese. They also hold together nicely when baked.
How do I keep the sliders from getting soggy?
Drain excess grease from the beef and avoid adding watery toppings before baking. Layering cheese beneath the meat also helps protect the bread. Add fresh toppings after baking when possible.
Can I make these sliders ahead of time?
Yes, you can cook the beef mixture ahead or fully assemble the sliders a few hours early. Keep them refrigerated until ready to bake. Fresh baking gives the best texture.
What cheese melts best for sliders?
American cheese, cheddar, Monterey Jack, and provolone all melt well. Many people like combining two cheeses for flavor and creaminess. Use what your family enjoys most.
Can I use ground turkey instead of beef?
Absolutely. Ground turkey is a lighter substitute and works very well. Add extra seasoning or a little onion for additional flavor if desired.
How many sliders should I plan per person?
Two sliders per person is a comfortable average when serving sides. Bigger appetites may prefer three. For parties, one to two each can work with many other foods available.
Can I freeze leftovers?
Yes, baked sliders freeze well when wrapped tightly. Freeze for up to 2 months. Reheat in the oven for the best bread texture.
A Fun Family Dinner Worth Making Again
Oven-Baked Cheeseburger Sliders bring all the comfort of cheeseburgers into an easy, shareable meal that fits busy family life. With melty cheese, savory beef, and warm buttery rolls, they deliver reliable results every time.
Because they are simple to prepare and easy to customize, these sliders work for weeknights, parties, and casual gatherings alike. Once you see how quickly they disappear, they are sure to become a favorite worth making again.