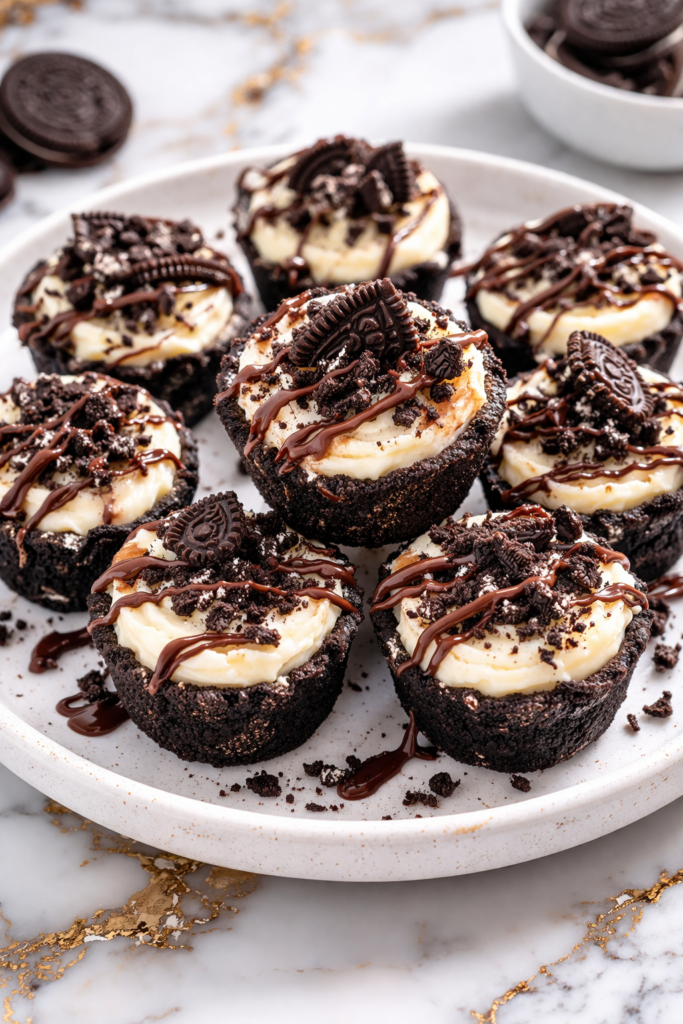
Some desserts instantly make people smile, and Oreo Cheesecake Cookie Cups are exactly that kind of treat.
They combine rich chocolate cookie flavor with creamy cheesecake filling in a fun handheld dessert that feels bakery-worthy while still being easy to make at home.
I first started making these for birthdays and family movie nights when I wanted something a little special without baking a full cheesecake.
The crisp cookie base and smooth creamy center quickly made them a regular request because they look impressive and taste even better.

Why You’ll Love This Recipe
These cookie cups are creamy, chocolatey, and wonderfully indulgent. Every bite combines Oreo cookie flavor with rich cheesecake filling for a dessert that feels both classic and exciting.
They are also wonderfully practical. Individual portions are easy to serve, easy to store, and perfect for parties, holidays, or dessert trays.
Families love how fun they are to make and eat. Children enjoy helping press the crust into the pan, and adults love the bakery-style finish. It is a dependable dessert recipe worth repeating.
Serves: 12 people
This recipe makes 12 standard muffin-sized cookie cups. It can easily be doubled for parties or larger gatherings.
Ingredients You’ll Need
For the Cookie Crust
- 24 Oreo cookies, finely crushed
- 5 tablespoons unsalted butter, melted
For the Cheesecake Filling
- 16 ounces cream cheese, softened
- 1/2 cup granulated sugar
- 2 large eggs
- 1 teaspoon pure vanilla extract
- 1/2 cup sour cream
- 8 Oreo cookies, chopped
Optional Toppings
- Whipped cream
- Crushed Oreo cookies
- Chocolate drizzle
- Mini Oreo cookies
- Sprinkles
- Fresh berries
Pro Tips
- Use room temperature cream cheese for the smoothest cheesecake filling.
- Line the muffin pan with paper liners for easy removal and cleaner presentation.
- Do not overmix after adding eggs. Mix just until combined for the best texture.
- Press the crust firmly into each cup so it holds together after baking.
- Let the cups cool fully before chilling. This helps prevent condensation.
- If serving children, let them decorate the tops with toppings after chilling.
Tools You’ll Need
- Standard 12-cup muffin pan
- Paper liners or nonstick spray
- Mixing bowls
- Hand mixer or stand mixer
- Measuring cups
- Measuring spoons
- Spoon or cookie scoop
- Food processor or zip-top bag with rolling pin
- Cooling rack
Substitutions and Variations
Classic Oreo cookies are the most popular choice, but golden sandwich cookies, mint cookies, or peanut butter sandwich cookies also work well.
Unsalted butter is ideal for the crust, though salted butter can be used if needed. It may add a slight salty contrast.
Full-fat cream cheese creates the richest cheesecake texture, but reduced-fat cream cheese can be used for a lighter option.
Sour cream adds smoothness and tang, though plain Greek yogurt can be substituted.
Vanilla extract gives classic flavor, but almond extract or cookies and cream flavoring can create a fun twist.
For a chocolate cheesecake version, add 2 tablespoons cocoa powder to the filling.
If you enjoy extra crunch, stir chopped Oreos into the filling and sprinkle more on top after baking.
For holiday versions, use seasonal Oreo flavors or festive sprinkles.
Mini muffin pans can be used for bite-sized cheesecake cups. Reduce baking time and watch closely.
For a peanut butter variation, swirl a spoonful of peanut butter into the filling before baking.
If you prefer a no-fuss topping, simply add whipped cream and cookie crumbs right before serving.
These dessert cups can also be made with gluten-free sandwich cookies if needed.
Make Ahead Tips
These cookie cups are an excellent make-ahead dessert, which makes them perfect for parties, holidays, and family gatherings. Bake them up to two days in advance, then keep them covered in the refrigerator until ready to serve. Chilling actually improves the texture and flavor.
You can also prepare the Oreo crust mixture one day ahead and store it in the refrigerator. This makes assembly faster when you are ready to bake.
If you would like to decorate them fresh, wait to add whipped cream or toppings until just before serving. This keeps everything looking neat and bakery-style.
For longer storage, the fully baked cheesecake cups can be frozen for up to two months.
Instructions
Step 1: Preheat the Oven
Preheat your oven to 325°F. Line a standard 12-cup muffin pan with paper liners or lightly grease each cup.
Liners make removal easier and give the cups a cleaner presentation. Greasing works well if you prefer no paper wrappers.
Step 2: Make the Oreo Crust
Place 24 Oreo cookies in a food processor and pulse into fine crumbs. Transfer to a bowl and stir in the melted butter until evenly moistened.
The mixture should resemble damp sand. This texture helps the crust hold together after baking.
Step 3: Form the Crusts
Divide the crumb mixture evenly among the muffin cups. Press firmly into the bottom of each cup using the back of a spoon or small glass.
Compact crusts hold together better when removed. Make the layer even for the best results.
Step 4: Prepare the Cheesecake Filling
In a mixing bowl, beat the softened cream cheese until smooth. Add the sugar and mix until creamy.
Add the eggs one at a time, mixing on low speed after each addition. Stir in the vanilla extract and sour cream until just combined.
Step 5: Fold in the Cookies
Gently fold the chopped Oreo cookies into the cheesecake filling. Stir only until evenly distributed.
This keeps the filling light while adding cookie pieces throughout each cup.
Step 6: Fill the Muffin Cups
Spoon or scoop the filling evenly over the prepared crusts. Fill each cup nearly to the top.
Smooth the tops lightly with the back of a spoon if needed. Even filling helps them bake uniformly.
Step 7: Bake
Bake for 18 to 22 minutes, or until the edges look set and the centers have a slight jiggle.
Do not overbake. The centers will continue setting as they cool.
Step 8: Cool and Chill
Remove the pan from the oven and let the cups cool at room temperature for 30 minutes. Transfer to the refrigerator and chill for at least 3 hours.
Chilling gives the cheesecake its classic firm, creamy texture. Overnight chilling works beautifully.
Step 9: Decorate and Serve
Top with whipped cream, crushed Oreos, chocolate drizzle, or mini cookies if desired. Serve chilled.
These are especially delicious straight from the refrigerator.
Serving Suggestions
Serve these cookie cups on a dessert tray with brownies, fruit, and chocolate treats for parties. Their individual size makes serving easy.
Pair them with coffee or hot chocolate for a cozy evening dessert. The cookies and cream flavor works wonderfully with warm drinks.
Add fresh berries on the side for a bright contrast to the rich cheesecake filling.
Serve them for birthdays or celebrations with extra whipped cream and festive sprinkles. They always feel special.
Place one in lunchbox-style dessert containers for an easy make-ahead sweet treat.
For holiday gatherings, arrange them on a platter with seasonal toppings or colored candies.
Leftovers and Storage
Oreo Cheesecake Cookie Cups store very well, making them a practical dessert to prepare ahead. Keep them refrigerated because of the cream cheese filling.
Place leftovers in an airtight container in the refrigerator for up to 5 days. If stacking layers, separate them with parchment paper.
For the best texture, keep toppings like whipped cream separate until serving. This prevents sogginess and keeps the presentation fresh.
To freeze, place chilled cookie cups on a tray until firm, then transfer to freezer-safe containers. Freeze for up to 2 months.
Thaw overnight in the refrigerator before serving. Add toppings after thawing for the best finish.
These cups are delicious cold straight from the refrigerator, which makes leftovers especially easy to enjoy.
Nutrition and Benefits
- Individual portions make serving simple and help with portion control.
- Cream cheese provides rich texture and satisfying flavor.
- Oreo cookies create a familiar dessert flavor loved by many ages.
- Make-ahead storage makes this dessert convenient for gatherings.
- Homemade desserts allow control over toppings and presentation.
Recipe FAQ
Can I use mini muffin pans?
Yes, mini muffin pans work very well for bite-sized treats. Reduce baking time and watch closely.
Do I need paper liners?
No, but liners make removal easier and create a cleaner look. Greasing the pan also works.
Why are my cheesecake cups cracked?
Overmixing or overbaking can cause cracks. Bake just until the centers slightly jiggle.
Can I make these ahead of time?
Absolutely. They are excellent made a day or two ahead and chilled until serving.
Can I freeze them?
Yes, they freeze very well for up to two months. Thaw overnight in the refrigerator.
Can I use flavored Oreos?
Yes, flavored sandwich cookies can create fun variations. Mint, golden, or peanut butter styles work nicely.
How do I know when they are done?
The edges should look set while the centers still have a slight wobble. They firm up fully as they chill.
A Fun Dessert Worth Making Again
These Oreo Cheesecake Cookie Cups are the kind of dessert that makes celebrations and everyday moments feel a little sweeter. They use simple ingredients, look impressive, and deliver creamy, reliable results every time.
The chocolate cookie crust, rich cheesecake center, and family-friendly flavor make them a treat worth keeping in regular rotation. Whether served at parties or enjoyed straight from the fridge, they are a dependable dessert you will be glad to make again.