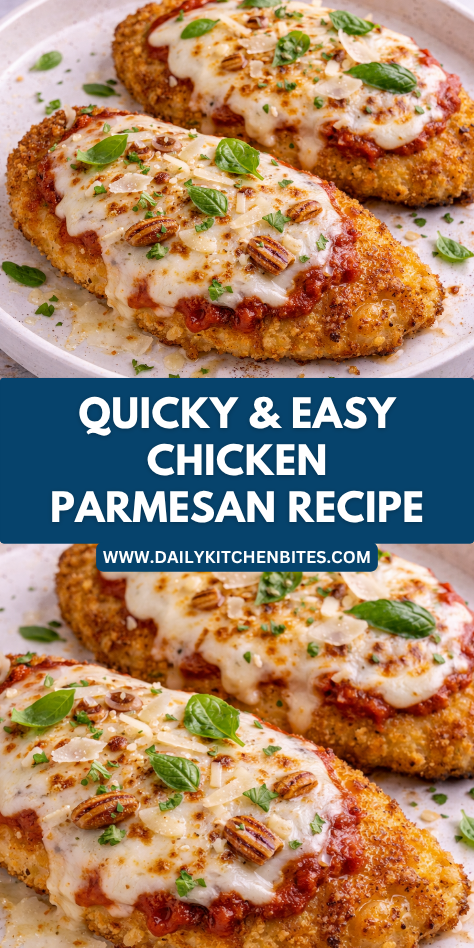
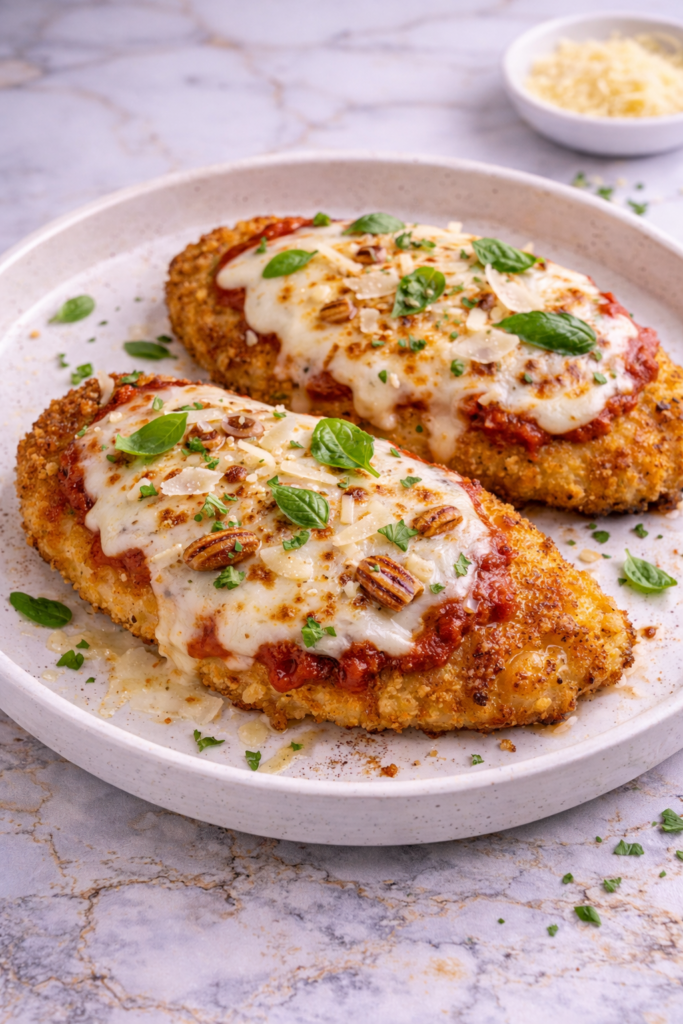
Some dinners feel like an instant comfort classic the moment they hit the table, and Easy Chicken Parmesan is one of those meals in our home.
Crispy golden chicken, rich tomato sauce, and melted cheese always bring everyone to the kitchen quickly.
I first started making this recipe when I wanted a restaurant-style dinner that still felt manageable on a busy weeknight.
It quickly became a family favorite because it uses familiar ingredients, comes together easily, and always feels warm, satisfying, and special.
Why You’ll Love This Recipe
This recipe brings together everything people love about classic comfort food. Tender chicken with a crisp coating is topped with savory sauce and gooey cheese for a meal that feels hearty and complete.
It is also wonderfully practical for home cooks. The steps are simple, the ingredients are easy to find, and much of the cooking can be done in one pan and one baking dish.
Families love how versatile it is. Serve it over pasta, with salad, or alongside vegetables, and it always fits the table beautifully.
Serves: 4 people
This recipe makes four generous servings using four chicken cutlets. It can easily be doubled for larger families or guests.
Ingredients You’ll Need
For the Chicken
- 2 large boneless skinless chicken breasts, sliced horizontally into 4 cutlets
- 1 teaspoon salt
- 1/2 teaspoon black pepper
- 1 teaspoon garlic powder
- 1 teaspoon Italian seasoning
For the Breading
- 1/2 cup all-purpose flour
- 2 large eggs
- 1 tablespoon water
- 1 cup Italian breadcrumbs or panko
- 1/2 cup grated Parmesan cheese
For Cooking and Topping
- 3 tablespoons olive oil
- 2 cups marinara sauce
- 1 1/2 cups mozzarella cheese, shredded or sliced
- 1/4 cup grated Parmesan cheese
- 2 tablespoons chopped parsley or basil
Optional for Serving
- Cooked spaghetti or pasta
- Garlic bread
- Caesar salad
- Roasted vegetables
Thin chicken cutlets cook faster and more evenly. If the chicken is thick, pound lightly to an even thickness before breading.
Pro Tips
Pat the chicken dry before seasoning and breading. Dry surfaces help coatings stick better and brown more evenly.
Use one hand for dry ingredients and one hand for wet ingredients during breading. This keeps the process cleaner and easier.
Do not overcrowd the skillet while browning the chicken. Cook in batches if needed so the coating stays crisp.
Use enough sauce to flavor the chicken, but do not drown it. Too much sauce can soften the crispy coating too much.
Bake only until the cheese melts and the chicken is cooked through. Overbaking can dry the chicken.
For families with younger children, cut the finished chicken into strips before serving. It is easier to eat and often more appealing.
Tools You’ll Need
- Large skillet
- Baking dish or sheet pan
- Tongs
- Measuring cups
- Measuring spoons
- Three shallow bowls for breading
- Knife
- Cutting board
- Meat mallet (optional)
- Spatula
A large oven-safe skillet can be especially useful because you can transfer directly from stovetop to oven.
Substitutions and Variations
Use chicken thighs instead of breasts if preferred. Boneless thighs stay juicy and flavorful.
Swap breadcrumbs for panko for extra crisp texture. Either works beautifully.
Use provolone, fontina, or Italian cheese blend instead of mozzarella for a different cheesy finish.
If you need gluten-free options, use gluten-free flour and breadcrumbs. Check labels on sauce as well.
Use store-bought marinara or homemade sauce depending on your schedule. Both can work very well.
For a lighter version, bake the breaded chicken instead of pan-frying. Spray lightly with oil before baking for better browning.
Add red pepper flakes to the sauce for a little heat.
Serve over zucchini noodles or roasted vegetables instead of pasta for a lower-carb option.
Top with fresh basil after baking for a brighter fresh flavor.
You can also turn leftovers into sandwiches by placing the chicken on toasted rolls with extra sauce and cheese.
Make Ahead Tips
This recipe is excellent for planning ahead on busy days. You can slice and season the chicken, prepare the breading station, and refrigerate the chicken up to 24 hours in advance.
The chicken can also be breaded earlier in the day and kept chilled on a tray until ready to cook. This makes dinnertime feel much easier.
If you want to get even further ahead, brown the chicken cutlets and refrigerate them. Add sauce and cheese later, then bake just before serving.
Marinara sauce can be warmed or made ahead as well. Having each component ready keeps the final steps quick and stress-free.
Instructions
Step 1: Preheat the Oven
Preheat your oven to 425°F. Lightly grease a baking dish or sheet pan.
A hot oven helps melt the cheese quickly and finish the chicken without drying it out. This keeps the coating crisp where it is not covered with sauce.
Step 2: Prepare the Chicken
Slice the chicken breasts horizontally into thinner cutlets, or pound them gently to even thickness. Pat dry with paper towels.
Season both sides with salt, black pepper, garlic powder, and Italian seasoning. Even seasoning gives great flavor throughout.
Step 3: Set Up the Breading Station
Place the flour in one shallow bowl. In a second bowl, whisk the eggs with 1 tablespoon water.
In a third bowl, combine breadcrumbs and grated Parmesan cheese. Arrange the bowls in order for easy dipping.
Step 4: Bread the Chicken
Dredge each chicken cutlet lightly in flour, shaking off excess. Dip into the egg mixture, then coat well in the breadcrumb mixture.
Press the crumbs gently onto the chicken so they adhere. Set breaded cutlets aside on a plate.
Step 5: Brown the Chicken
Heat olive oil in a large skillet over medium heat. Add the chicken cutlets in batches if needed.
Cook for 3 to 4 minutes per side until golden brown. The chicken does not need to be fully cooked yet because it will finish in the oven.
Step 6: Arrange for Baking
Transfer the browned chicken cutlets to the prepared baking dish in a single layer. Spoon marinara sauce over each piece, leaving some crisp edges uncovered if desired.
Top each cutlet with mozzarella cheese and sprinkle with extra Parmesan.
Step 7: Bake Until Bubbling
Bake for 12 to 18 minutes, depending on thickness, until the chicken reaches 165°F internally and the cheese is melted and bubbling.
If you would like extra color on top, broil for 1 to 2 minutes at the end while watching closely.
Step 8: Rest and Garnish
Remove the dish from the oven and let it rest for 5 minutes. This helps the cheese settle slightly and keeps the chicken juicy.
Sprinkle with chopped parsley or basil before serving. Fresh herbs add a bright finishing touch.
Step 9: Serve
Serve warm over pasta, alongside salad, or with vegetables. Spoon extra warm marinara sauce over the top if desired.
This meal is especially comforting with garlic bread on the side.
Serving Suggestions
Serve Chicken Parmesan over spaghetti, linguine, or penne for the classic pairing. The pasta is perfect for catching extra sauce and cheese.
Add a Caesar salad or crisp green salad for freshness and balance. A light salad pairs beautifully with the rich main dish.
Serve with roasted broccoli, green beans, or zucchini for an easy family dinner plate. Vegetables make the meal feel complete.
Warm garlic bread or toasted rolls are always welcome on the side. They are perfect for scooping up sauce.
For a lighter option, serve over zucchini noodles or spaghetti squash. The chicken remains the star of the plate.
Use leftovers sliced into toasted sandwiches with extra marinara and melted cheese. This makes an excellent lunch the next day.
Leftovers and Storage
Allow leftovers to cool slightly before storing. Place chicken in an airtight container and refrigerate for up to 4 days.
To reheat, place in a 350°F oven until warmed through. This helps keep the breading from becoming too soft.
You can also microwave individual portions in short intervals, though the coating will be softer. Cover loosely while reheating.
For freezing, cool completely and wrap portions well in freezer-safe containers for up to 2 months. Thaw overnight in the refrigerator before reheating.
Nutrition and Benefits
- Chicken provides protein that helps make the meal filling and satisfying.
- Homemade preparation allows you to control ingredients and seasoning.
- Tomato sauce adds rich flavor and pairs well with vegetables or pasta.
- Baking after browning helps finish the chicken evenly.
- The recipe can be adjusted with gluten-free ingredients or lighter sides.
- Leftovers are versatile and useful for lunches or second dinners.
Recipe FAQ
Can I bake the chicken instead of frying it?
Yes, place breaded cutlets on a greased sheet pan, spray lightly with oil, and bake until golden before adding sauce and cheese.
Why is my breading falling off?
Pat the chicken dry first and press the breadcrumbs onto the surface firmly. Letting breaded cutlets rest a few minutes also helps.
Can I use store-bought sauce?
Absolutely. A good marinara sauce is a great time-saving shortcut for busy nights.
What cheese works best?
Mozzarella is classic, but provolone, fontina, or Italian blends also melt beautifully.
Can I make this ahead of time?
Yes, bread and brown the chicken ahead, then add sauce and cheese before baking later.
How do I know the chicken is done?
The safest method is using a thermometer. Chicken should reach 165°F in the thickest part.
What sides go best with Chicken Parmesan?
Pasta, salad, roasted vegetables, garlic bread, and simple greens are all excellent choices.
Conclusion
A Comforting Classic Worth Making Again
This Easy Chicken Parmesan is the kind of dependable dinner that makes any evening feel warm and satisfying. It uses simple ingredients, easy steps, and delivers crispy chicken with rich sauce and melted cheese every time.
It is worth making again because it fits weeknights, family dinners, and casual entertaining so naturally. With reliable results, comforting flavor, and broad family appeal, this is a meal everyone will be happy to enjoy again and again.