I’m about to share something that’ll make you question why anyone bothers with complicated desserts.
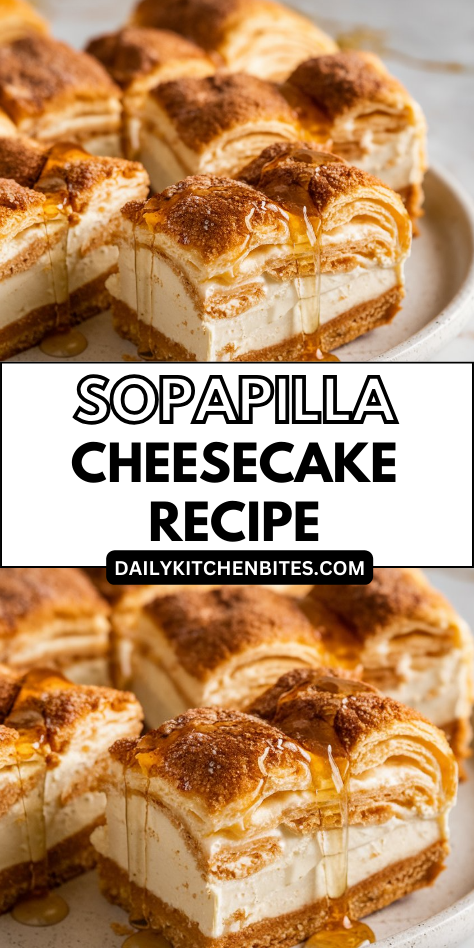
This sopapilla cheesecake? It’s basically cheating, but the good kind where nobody gets hurt and everyone gets fed.
We’re talking crescent roll dough doing all the heavy lifting while cream cheese sits pretty in the middle, creating something that tastes like you spent hours in the kitchen when you barely broke a sweat. Trust me, your biggest challenge will be deciding who deserves a piece.
Why You’ll Love this Sopapilla Cheesecake
Convenience meets indulgence in this ridiculously simple dessert that’ll have you questioning why you ever stressed over fancy cheesecakes.
I’m talking about a recipe that uses crescent roll dough as the crust – genius, right? No mixing flour, no chilling dough, no rolling pins. Just press, fill, and bake.
The creamy center tastes like traditional cheesecake but without the fussy water bath or hour-long baking time. That cinnamon-sugar topping creates this amazing crispy layer that mimics sopapillas perfectly.
Plus, it feeds a crowd and costs way less than bakery desserts. Sometimes shortcuts actually taste better.
What Ingredients are in Sopapilla Cheesecake?
This dessert uses just a handful of pantry staples that you probably already have sitting around your kitchen.
- 2 cans (8 oz each) crescent roll dough
- 2 packages (8 oz each) cream cheese, softened
- 1½ cups granulated sugar, divided
- 1 teaspoon vanilla extract
- ¼ cup melted butter
- 1 teaspoon cinnamon
- Optional: honey for drizzling
Make sure your cream cheese is properly softened – nobody wants lumpy cheesecake filling because they got impatient and tried to mix cold cream cheese, which basically turns into a workout nobody signed up for.

How to Make this Sopapilla Cheesecake
Step 1
Preheat your oven to 350°F and grease a 9×13 inch pan generously.
Trust me, you don’t want this beauty sticking to the pan after all your hard work, and nobody has time for dessert destruction when you’re trying to serve guests.
Step 2: Press the First Layer of Dough
Take one can of crescent roll dough and press it into the bottom of your prepared pan, making sure to seal any seams.
Think of this as building the foundation of your dessert masterpiece – you want it smooth and even, not looking like a patchwork quilt gone wrong.
Step 3: Make the Creamy Cheesecake Filling
Beat together 2 packages of softened cream cheese, 1 cup of granulated sugar, and 1 teaspoon of vanilla extract until the mixture is completely smooth.
This is where that properly softened cream cheese really pays off, because cold cream cheese will turn this step into an arm workout that would make your personal trainer jealous.
Step 4: Spread the Filling
Gently spread your cream cheese mixture over the bottom layer of dough, making sure to reach all the corners.
Use a spatula to smooth it out evenly – you want every bite to have that perfect ratio of creamy filling to flaky pastry.
Step 5: Add the Top Crust
Carefully place the second can of crescent roll dough over the cream cheese layer, then brush the entire surface with ¼ cup of melted butter.
This buttery step is what gives you that gorgeous golden color and helps the cinnamon sugar stick like it’s supposed to.
Step 6: Create the Cinnamon Sugar Topping
Mix the remaining ½ cup of sugar with 1 teaspoon of cinnamon, then sprinkle this magical mixture evenly over the buttered top.
This is what transforms your dessert from regular cheesecake into something that tastes like it came straight from a Mexican bakery.
Step 7: Bake Until Golden Perfection
Slide your pan into the oven and bake for 25-35 minutes, until the top turns a beautiful golden brown.
You’ll know it’s ready when your kitchen smells absolutely incredible and the top looks like it’s ready for its close-up. For consistently perfect results every time, consider investing in premium baking appliances that provide even heat distribution and precise temperature control.
Step 8: Cool and Chill Before Serving
Let the cheesecake cool completely, then pop it in the refrigerator to chill before cutting into squares.
This cooling step isn’t optional – try to cut it while warm and you’ll end up with a gooey mess instead of clean, Instagram-worthy slices.
What to Serve with Sopapilla Cheesecake
This rich, sweet treat is perfect for dessert after a hearty Mexican meal, but honestly, it’s indulgent enough to stand on its own.
Pair it with a strong cup of coffee or Mexican hot chocolate to balance out all that creamy sweetness. Fresh berries like strawberries or raspberries add a bright, tart contrast that cuts through the richness beautifully.
For an extra touch of authenticity, drizzle warm honey on top or serve alongside a scoop of vanilla ice cream. It also makes an impressive brunch dessert when you’re entertaining, especially with mimosas or cafe con leche.
The cinnamon-sugar topping practically begs for a glass of cold milk too.
Sopapilla Cheesecake Substitutions and Variations
While sopapilla cheesecake is already pretty perfect as-is, I know you might want to shake things up or work with what’s hiding in your pantry.
Can’t find crescent rolls? Try phyllo dough for extra flakiness. Want to cut calories? Use reduced-fat cream cheese or Greek yogurt instead.
I’d swap vanilla for almond extract, or fold mini chocolate chips into that creamy filling. Feeling fancy? Add orange zest or a splash of rum.
No butter? Melted margarine works fine. You could even try puff pastry if you’re feeling adventurous – though it’ll taste less authentically sopapilla-like.
Leftovers and Storage for this Sopapilla Cheesecake
Good news – your sopapilla cheesecake keeps beautifully, which means you don’t have to demolish the entire pan in one sitting (though I won’t judge if you try).
I always store mine covered tightly in the fridge, where it stays fresh for up to five days. The cream cheese layer actually gets even creamier after a day or two.
Want to freeze some? Cut into individual squares, wrap each piece in plastic wrap, then pop into freezer bags. They’ll keep for three months. Just thaw in the fridge overnight before serving.
Final Thoughts for Sopapilla Cheesecake
What I love most about sopapilla cheesecake is how it delivers restaurant-quality dessert with pantry staples and minimal fuss.
Those buttery, cinnamon-kissed layers wrapped around silky cream cheese filling create pure comfort in every bite. It’s the kind of dessert that saves the day when unexpected guests drop by or when you need something impressive for potlucks without spending hours in the kitchen.
Whether you’re feeding a crowd during the holidays or just treating your family to something special on a random Tuesday, this recipe never disappoints.
Sometimes the best things really do come from the simplest ingredients.