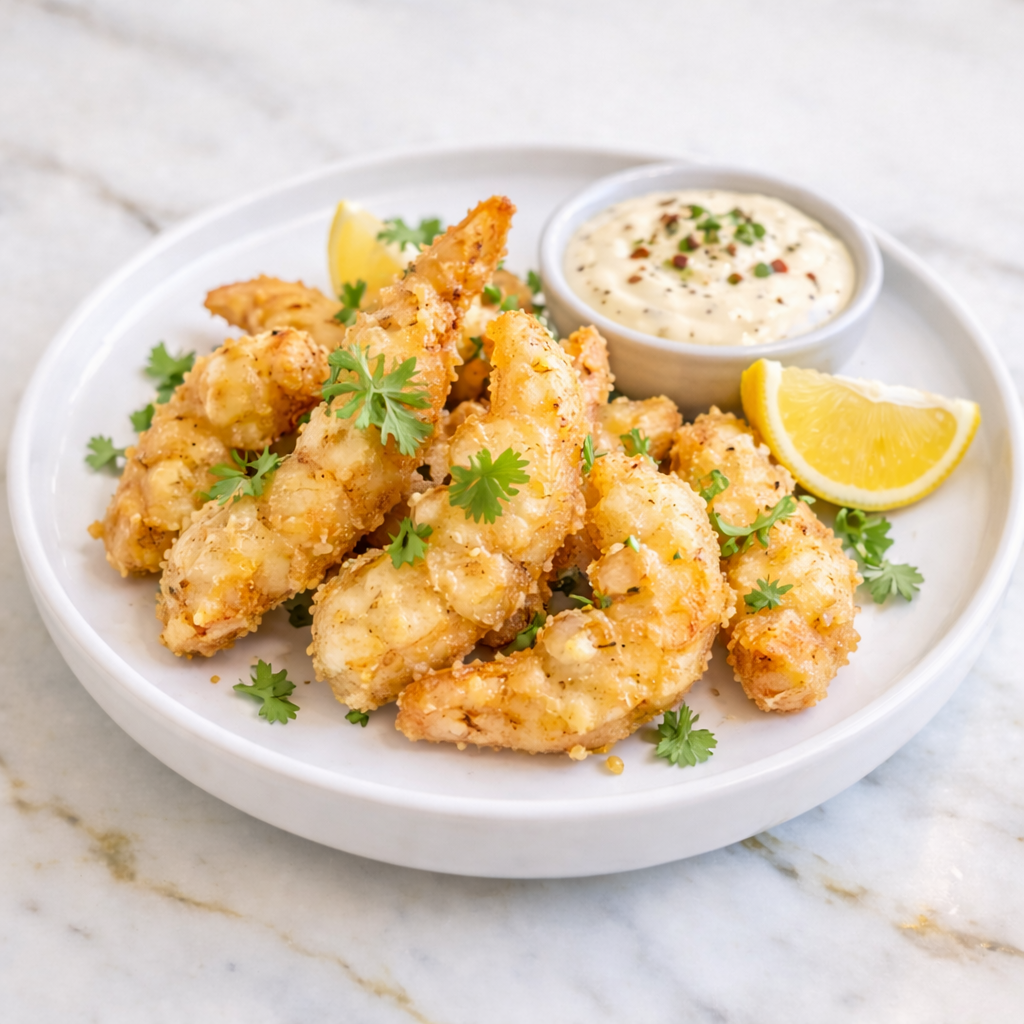
Shrimp coated in a light, crispy crust with a creamy Kewpie mayo sauce is one of those combinations that sounds simple but delivers way more than you expect.
A lot of people are familiar with Kewpie as a condiment but haven’t tried cooking with it yet. Once you do, it opens up a whole new way to think about sauces and coatings.
I put this together in my own kitchen and it came out crispy, creamy, and full of flavor. This post walks you through every step so yours turns out just as satisfying.

Why You’ll Love This Recipe
This Kewpie Shrimp brings together crispy, golden shrimp with a creamy and slightly tangy sauce that coats every bite. The contrast between crunchy and smooth textures makes it incredibly satisfying. It’s a dish that feels restaurant-quality but is simple enough for home cooking.
Another reason to love this recipe is how quickly it comes together. With just a few ingredients and straightforward steps, you can have a flavorful dish ready in under 30 minutes. It’s perfect for weeknight dinners or when you want something a little special without a lot of effort.
Serves: 4 people
This recipe serves four as a main dish or up to six as an appetizer. The portions are generous and can easily be adjusted. It’s also great for sharing at gatherings or family meals.
Ingredients You’ll Need
For the Shrimp:
- 1 lb large shrimp, peeled and deveined
- 1/2 cup all-purpose flour
- 1/2 cup cornstarch
- 1/2 tsp salt
- 1/4 tsp black pepper
- 1 egg
- 1/2 cup cold water
- Oil for frying
For the Sauce:
- 1/2 cup Kewpie mayonnaise
- 2 tbsp sweet chili sauce
- 1 tbsp lemon juice
- 1 tsp honey
Optional Add-Ins:
- 1/2 tsp garlic powder
- 1/4 tsp paprika
- Chopped green onions for garnish
Pro Tips
Pat the shrimp dry before coating to help the batter stick better. Excess moisture can prevent the coating from crisping properly. This step ensures a better texture.
Use a combination of flour and cornstarch for a lighter, crispier coating. Cornstarch helps create that delicate crunch. It’s key for achieving restaurant-style results.
Keep the batter cold to help create a crisp texture when frying. Cold batter reacts better with hot oil. This contrast helps form a light, crispy coating.
Fry the shrimp in batches to avoid overcrowding the pan. Overcrowding can lower the oil temperature and result in soggy shrimp. Giving them space ensures even cooking.
Make sure the oil is hot enough before frying, around 350°F. Proper temperature helps the shrimp cook quickly and evenly. It also prevents excess oil absorption.
Toss the shrimp in the sauce just before serving to keep them crispy. Adding the sauce too early can soften the coating. This keeps the texture perfect.
Tools You’ll Need
- Large mixing bowl
- Whisk
- Deep skillet or pot
- Tongs or slotted spoon
- Paper towels
- Measuring cups and spoons
Substitutions and Variations
You can use panko breadcrumbs instead of batter for a different type of crunch. This creates a slightly heavier but still crispy coating. It’s a great alternative.
If you don’t have Kewpie mayonnaise, regular mayonnaise with a bit of lemon juice or rice vinegar works. This helps mimic the tangy flavor. It’s an easy substitute.
For a lighter version, you can air-fry or bake the shrimp instead of deep frying. While the texture will differ slightly, it still tastes great. It’s a good option for less oil.
You can adjust the sauce by adding more sweet chili sauce for sweetness or more lemon juice for tang. This makes it easy to customize. Small changes can shift the flavor profile.
Adding a bit of sriracha or chili flakes can give the dish a spicy kick. This pairs well with the creamy sauce. It’s perfect for those who enjoy heat.
Make Ahead Tips
This Kewpie Shrimp is best enjoyed fresh for maximum crispiness, but you can still prep several components ahead of time. You can peel and devein the shrimp up to one day in advance and store them in the refrigerator in an airtight container. Keeping them dry and chilled helps maintain their texture.
The sauce can also be mixed ahead and stored in the refrigerator for up to three days. This actually allows the flavors to blend and develop more depth. Just give it a quick stir before using.
If you want to save time, you can prepare the dry ingredients for the batter ahead of time and keep them ready to go. When it’s time to cook, simply add the wet ingredients and mix. This helps streamline the process.
For best results, fry the shrimp just before serving and toss with the sauce at the last moment. This ensures the coating stays crisp and the texture remains perfect. A little planning makes this dish quick and easy.
Instructions
Step 1: Prepare the Shrimp
Pat the shrimp dry with paper towels to remove excess moisture. This helps the batter stick properly and ensures a crisp coating. Set aside while preparing the batter.
Step 2: Make the Batter
In a large bowl, whisk together the flour, cornstarch, salt, and black pepper. Add the egg and cold water, mixing until a smooth batter forms. Keep the batter slightly thin for a light coating.
Step 3: Heat the Oil
Pour oil into a deep skillet or pot and heat to about 350°F. The oil should be hot enough to fry quickly without absorbing too much grease. Test with a small drop of batter to ensure it sizzles.
Step 4: Coat the Shrimp
Dip each shrimp into the batter, allowing any excess to drip off. Make sure each piece is evenly coated. This ensures a consistent texture when fried.
Step 5: Fry the Shrimp
Carefully place the shrimp into the hot oil in small batches. Fry for about 2 to 3 minutes until golden and crispy. Remove with a slotted spoon and place on paper towels to drain.
Step 6: Make the Sauce
In a separate bowl, mix the Kewpie mayonnaise, sweet chili sauce, lemon juice, and honey. Stir until smooth and well combined. Taste and adjust if needed.
Step 7: Toss and Coat
Place the fried shrimp in a large bowl and gently toss with the sauce. Coat evenly without overmixing to preserve the crisp texture. Do this step just before serving.
Step 8: Garnish and Serve
Transfer the shrimp to a serving plate and garnish with chopped green onions if desired. Serve immediately while warm and crispy. This ensures the best flavor and texture.
Serving Suggestions
This Kewpie Shrimp is perfect served over a bed of steamed white rice. The rice absorbs the creamy sauce and balances the crispy texture. It creates a satisfying and complete meal.
You can also serve it with noodles for a slightly different twist. The sauce pairs well with simple stir-fried or plain noodles. This makes the dish feel even more filling.
For a lighter option, serve it alongside a fresh green salad. The crisp vegetables contrast nicely with the rich shrimp. It helps balance the overall meal.
It works well as an appetizer served with toothpicks or small skewers. This makes it easy to share at gatherings or parties. It’s always a crowd favorite.
You can also pair it with roasted or steamed vegetables like broccoli or snap peas. These sides complement the dish without overpowering it. It adds variety to your plate.
Leftovers and Storage
Store leftover shrimp in an airtight container in the refrigerator for up to two days. Allow them to cool completely before storing. This helps maintain quality.
Keep in mind that the coating may lose its crispiness after refrigeration. To reheat, place the shrimp in an oven or air fryer to help restore some texture. Avoid microwaving if possible.
If reheating in the oven, use a low to moderate temperature and heat until warmed through. This helps prevent overcooking. A quick reheat works best.
It’s not recommended to freeze this dish, as the texture of the batter and sauce may change. Fresh preparation yields the best results. This ensures the best flavor and consistency.
For best enjoyment, try to consume leftovers as soon as possible. The dish is at its peak when freshly made. Proper reheating can still make it enjoyable.
Nutrition and Benefits
- Shrimp is a great source of lean protein, helping support muscle health and keep you full. It’s a nutritious base for the dish.
- The dish provides a balance of protein and carbohydrates when served with rice or noodles. This makes it a satisfying meal.
- Using Kewpie mayonnaise adds richness and flavor, enhancing the overall experience. Moderation helps maintain balance.
- Cooking at home allows you to control the ingredients and adjust portions. This makes it easier to create a more balanced dish.
- Adding vegetables as sides can increase fiber and nutrient intake. This helps round out the meal nutritionally.
Recipe FAQ
Can I use frozen shrimp?
Yes, just make sure to thaw and pat them dry thoroughly before cooking. Removing excess moisture is important for crispiness. Proper preparation makes a big difference.
How do I keep the shrimp crispy?
Fry them in hot oil and avoid overcrowding the pan. Toss them in the sauce just before serving. These steps help maintain their texture.
Can I make this recipe without frying?
Yes, you can bake or air-fry the shrimp for a lighter version. The texture will be slightly different but still delicious. It’s a good alternative.
What can I use instead of sweet chili sauce?
You can mix a little honey with a mild hot sauce as a substitute. This creates a similar sweet and tangy flavor. Adjust to taste.
Can I make the sauce spicier?
Yes, adding sriracha or chili flakes can increase the heat. This pairs well with the creamy base. Adjust based on your preference.
Is this recipe kid-friendly?
Yes, especially if you keep the sauce mild and slightly sweet. Most kids enjoy the crispy texture. It’s easy to adjust flavors.
What oil is best for frying?
Neutral oils like vegetable or canola oil work best. They have a high smoke point and don’t overpower the flavor. This ensures the best results.
A Crispy and Creamy Dish Worth Repeating
Once you make this at home, it’s going to be one of those recipes you come back to whenever you want something a little different but completely doable. The crispy shrimp paired with that rich, creamy Kewpie sauce is a combination that always impresses without requiring a lot of effort.
I love making this as a quick weeknight dinner or even as an appetizer when I have people over. It comes together fast and looks way more involved than it actually is. Simple ingredients, bold flavor, and a result worth repeating. I hope it earns a regular spot in your kitchen.