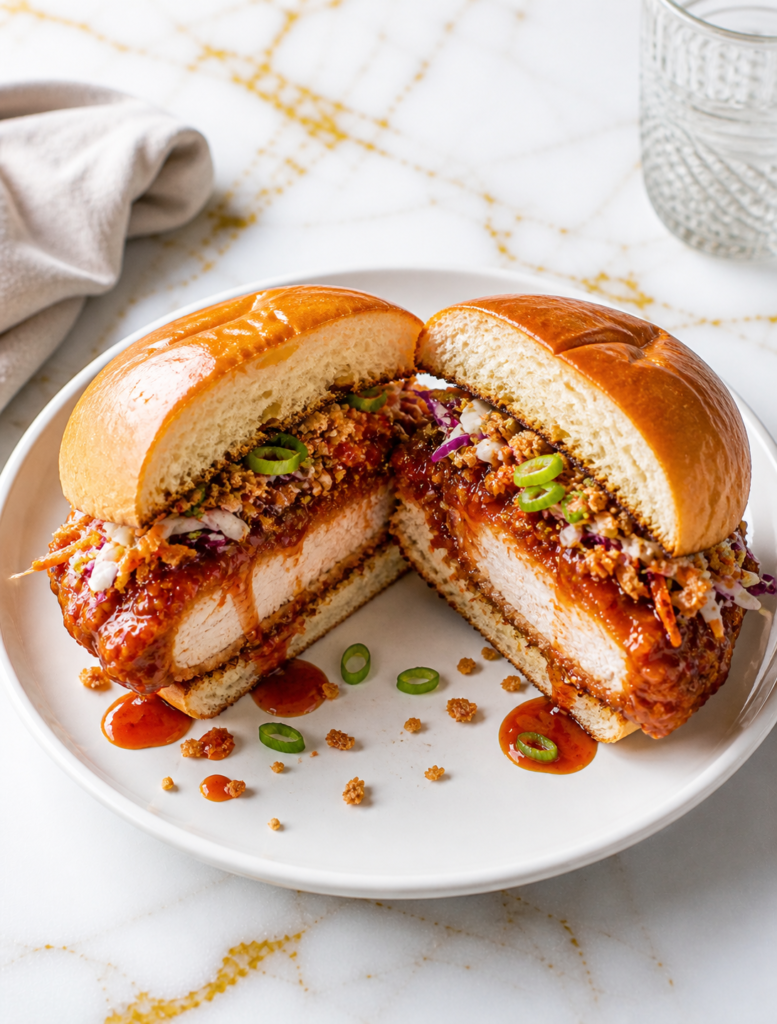
I like making this Korean crispy chicken sandwich when I want something crunchy, flavorful, and a little different from our usual meals. The crispy coating and bold sauce come together in a way that feels both comforting and exciting. It’s the kind of sandwich that turns a simple dinner into something everyone looks forward to.
This has become a favorite in my home because it’s surprisingly easy to pull together with a little planning. The chicken fries up golden and crisp, while the sauce adds just the right balance of sweet and heat. It’s perfect for family meals, casual weekends, or anytime you want a satisfying homemade sandwich.

Why You’ll Love This Recipe
This Korean crispy chicken sandwich delivers a great mix of textures and flavors in every bite. The outside of the chicken is crisp and golden, while the inside stays juicy and tender. The sauce adds a bold, slightly sweet heat that pairs perfectly with the crunchy coating.
It’s also a practical recipe that fits into everyday cooking. While it feels like something you’d order at a restaurant, it’s made with simple ingredients and straightforward steps. That balance makes it a fun but reliable option for family meals or casual gatherings.
Serves: 4 people
This recipe makes four generous sandwiches, each with a hearty portion of crispy chicken and toppings. It’s easy to double if you’re feeding a crowd or want leftovers for the next day. You can also adjust portion sizes depending on appetites and sides.
Ingredients You’ll Need
For the Chicken:
- 4 boneless, skinless chicken thighs or breasts
- 1 cup buttermilk
- 1 teaspoon salt
- 1/2 teaspoon black pepper
For the Coating:
- 1 cup all-purpose flour
- 1/2 cup cornstarch
- 1 teaspoon garlic powder
- 1 teaspoon onion powder
- 1/2 teaspoon paprika
- 1/2 teaspoon salt
- 1/2 teaspoon black pepper
For Frying:
- Vegetable oil (enough for frying, about 2–3 cups depending on pan size)
For the Korean Sauce:
- 3 tablespoons gochujang (Korean chili paste)
- 2 tablespoons honey
- 1 tablespoon soy sauce
- 1 tablespoon brown sugar
- 2 cloves garlic, minced
- 1 teaspoon sesame oil
For Assembly:
- 4 burger buns
- 1 cup shredded cabbage or lettuce
- 1/2 cup sliced pickles
- 2 tablespoons mayonnaise (optional)
Pro Tips
Marinate the chicken in buttermilk for at least an hour if possible. This helps tenderize the meat and adds flavor that carries through after frying.
Use a mix of flour and cornstarch for the coating to get an extra crispy texture. The cornstarch helps create that light, crunchy crust.
Make sure the oil is hot enough before frying, around 350°F. If the oil is too cool, the coating can become greasy instead of crisp.
Avoid overcrowding the pan when frying the chicken. Cooking in batches keeps the oil temperature steady and ensures even browning.
Let the fried chicken rest on a wire rack instead of paper towels. This keeps the coating crisp instead of trapping steam underneath.
Toast the buns lightly before assembling the sandwich. This adds texture and helps prevent them from becoming soggy.
Tools You’ll Need
- Large mixing bowls
- Deep skillet or heavy-bottomed pot
- Tongs
- Wire rack
- Baking sheet
- Measuring cups and spoons
- Thermometer (for oil temperature)
- Cutting board
- Knife
Substitutions and Variations
Make It Milder
Reduce the amount of gochujang and add a bit more honey to the sauce. This creates a sweeter, less spicy version that works well for kids.
Use Chicken Tenders
Swap the larger chicken pieces for chicken tenders. They cook faster and are easier to handle, especially for younger eaters.
Try a Baked Version
Bake the coated chicken in the oven at 425°F with a light spray of oil. It won’t be as crispy as frying, but it’s a lighter option.
Switch the Slaw
Use a simple cucumber slaw or carrot slaw instead of cabbage. This adds a fresh crunch and slightly different flavor.
Make It Extra Crunchy
Add a handful of crushed cornflakes or panko breadcrumbs to the coating. This gives the chicken an even crispier texture.
Make Ahead Tips
This Korean crispy chicken sandwich can be partially prepared ahead of time to make cooking easier when you’re ready to serve. You can marinate the chicken in buttermilk up to 24 hours in advance, which helps deepen the flavor and tenderize the meat. The sauce can also be mixed and stored in the refrigerator for up to three days, making assembly quicker.
If you want to go further, you can prepare the dry coating mixture ahead and keep it in an airtight container. The cabbage or lettuce can be washed and shredded in advance, then stored in the fridge until needed. Keeping these elements ready helps turn this into a simple, manageable meal even on busy days.
Instructions
Step 1: Marinate the Chicken
Place the chicken in a bowl with buttermilk, salt, and black pepper. Make sure each piece is fully coated, then cover and refrigerate for at least 1 hour or up to overnight. This step helps create tender, flavorful chicken.
Step 2: Prepare the Coating
In a separate bowl, combine the flour, cornstarch, garlic powder, onion powder, paprika, salt, and black pepper. Mix well so the seasoning is evenly distributed. This mixture will create the crispy outer layer.
Step 3: Heat the Oil
Pour vegetable oil into a deep skillet or pot and heat it to 350°F. Use a thermometer if possible to maintain a steady temperature. Proper heat ensures the chicken cooks evenly and becomes crispy.
Step 4: Coat the Chicken
Remove the chicken from the buttermilk, letting any excess drip off. Dredge each piece in the flour mixture, pressing lightly to help the coating stick. Set the coated chicken aside on a plate while you finish the rest.
Step 5: Fry the Chicken
Carefully place the coated chicken into the hot oil, cooking in batches if needed. Fry for about 6 to 8 minutes per side, or until golden brown and fully cooked through. Transfer to a wire rack to keep the coating crisp.
Step 6: Make the Sauce
In a small saucepan over low heat, combine gochujang, honey, soy sauce, brown sugar, garlic, and sesame oil. Stir until smooth and slightly thickened. Remove from heat once everything is well blended.
Step 7: Coat the Chicken with Sauce
Lightly brush or toss the fried chicken with the prepared sauce. You can adjust how much sauce you use depending on your preference. This step gives the sandwich its signature flavor.
Step 8: Assemble the Sandwich
Toast the burger buns lightly, then spread a thin layer of mayonnaise if using. Add the crispy chicken, followed by shredded cabbage or lettuce and sliced pickles. Close the sandwich and serve immediately.
Serving Suggestions
These sandwiches pair well with simple sides like oven fries or sweet potato fries. The crisp texture of the fries complements the crunchy chicken and rich sauce nicely.
You can also serve them with a light coleslaw on the side for extra freshness. The cool, crisp vegetables balance the bold flavors of the sandwich.
For a lighter option, serve the chicken on a bed of greens instead of a bun. This turns it into a satisfying salad while keeping all the flavor.
Pickled vegetables such as radishes or cucumbers make a great addition to the plate. Their tangy flavor cuts through the richness and adds contrast.
If you’re serving a group, consider offering extra sauce on the side. This lets everyone adjust the flavor to their liking.
Leftovers and Storage
If you have leftovers, store the chicken and toppings separately to maintain the best texture. Place the cooked chicken in an airtight container and refrigerate for up to 3 days. Keep the sauce and vegetables in separate containers to prevent sogginess.
To reheat, warm the chicken in a 350°F oven for about 10 to 12 minutes until heated through and crisp again. Avoid microwaving if possible, as it can soften the coating. If freezing, store the cooked chicken without sauce for up to 2 months, then reheat in the oven before adding fresh sauce and assembling.
Nutrition and Benefits
- This sandwich provides a solid source of protein from the chicken, which helps keep you full and supports muscle health. It’s a satisfying option for both adults and growing kids.
- The cabbage or lettuce adds fiber and a bit of freshness, helping balance the richness of the fried chicken. This makes the meal feel more complete.
- Using homemade sauce allows you to control the level of sugar and sodium. This makes it easier to adjust the recipe to your family’s needs.
- Frying at the correct temperature helps reduce excess oil absorption. This keeps the texture crisp without making the chicken overly heavy.
- You can make simple adjustments, like baking instead of frying, to suit different dietary preferences. This flexibility makes the recipe more versatile.
Recipe FAQ
Can I bake the chicken instead of frying it?
Yes, you can bake the chicken at 425°F on a wire rack over a baking sheet. Spray lightly with oil to help it crisp up. While it won’t be as crunchy as frying, it still turns out flavorful.
What is gochujang and where can I find it?
Gochujang is a Korean chili paste that has a mix of spicy, sweet, and savory flavors. It’s commonly found in the international aisle of grocery stores or at Asian markets. It keeps well in the refrigerator once opened.
How do I keep the chicken crispy after frying?
Place the chicken on a wire rack instead of paper towels after frying. This allows air to circulate and prevents the coating from becoming soggy. Keeping it warm in a low oven can also help.
Can I use chicken breasts instead of thighs?
Yes, chicken breasts work well, especially if sliced into thinner pieces. They may cook slightly faster, so keep an eye on them to avoid drying out. Both options can be delicious.
Is this sandwich very spicy?
The level of spice depends on how much gochujang you use. You can reduce it and add more honey for a milder flavor. This makes it easier to adjust for different preferences.
Can I prepare this for a group?
Yes, you can fry the chicken in batches and keep it warm in the oven until ready to serve. Set up a simple assembly station so everyone can build their own sandwich. This works well for gatherings.
What buns work best for this sandwich?
Soft burger buns or brioche buns are a great choice because they hold up well to the crispy chicken and sauce. Lightly toasting them helps prevent sogginess. Choose a bun that’s sturdy but still soft.
Conclusion
This Korean crispy chicken sandwich is a comforting and satisfying meal that brings bold flavor into a simple, homemade dish. It’s easy to prepare with a little planning and delivers consistent results that make it worth adding to your regular rotation.
With its crispy texture and balanced sauce, it’s a recipe that works well for family dinners, casual weekends, or even meal prep. It’s dependable, flavorful, and something you’ll find yourself coming back to again and again.