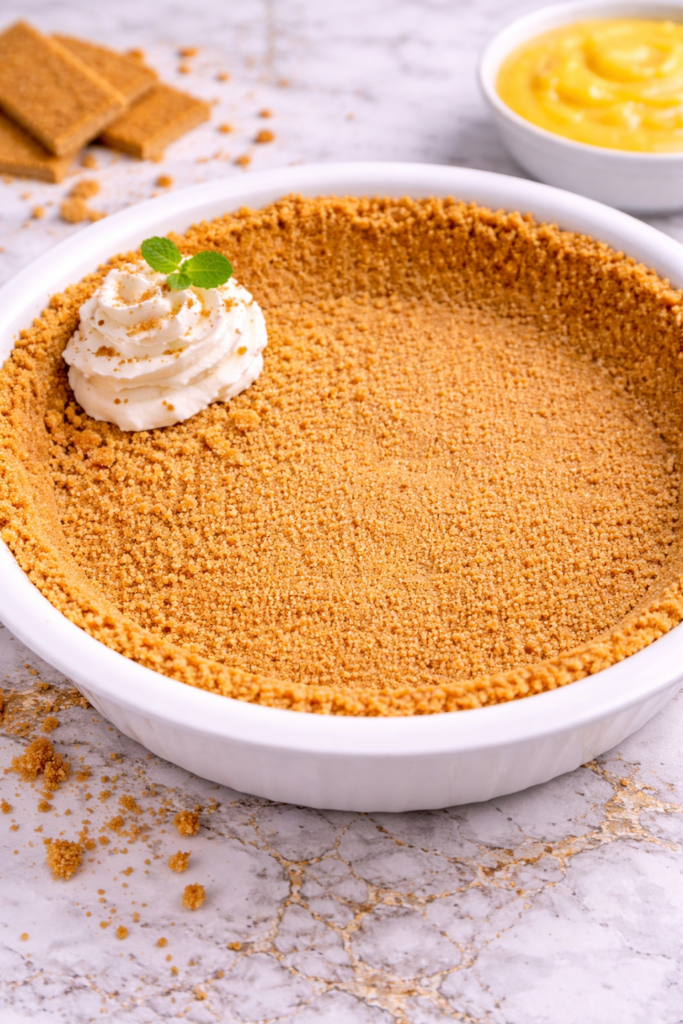
Some recipes become kitchen essentials because they make so many desserts easier, and Easy Graham Cracker Crust is one of those dependable basics in my home.
With just a few simple ingredients, it creates a buttery, sweet crust that works beautifully for pies, cheesecakes, bars, and no-bake treats. It is the kind of recipe worth learning once and using often.
I love making this crust because it is quick, reliable, and always tastes better than store-bought versions.
The texture is crisp yet tender, and the flavor pairs with everything from creamy fillings to fresh fruit. Whether I need a last-minute dessert base or something special for a holiday pie, this recipe always comes through.

Why You’ll Love This Recipe
Easy Graham Cracker Crust is buttery, lightly sweet, and incredibly versatile. It adds the perfect crisp base to many desserts without requiring complicated baking skills or special equipment.
This recipe is especially practical because it uses pantry ingredients and comes together in minutes. With graham crackers, butter, and sugar, you can have a homemade crust ready faster than a trip to the store.
Another reason to love it is how flexible it can be. Use it baked or no-bake, change the sweetness, or add spices depending on the dessert. It is one of those foundational recipes every home baker can use again and again.
Serves: 8 people
This recipe makes one standard 9-inch pie crust or cheesecake crust, serving about eight slices depending on the dessert filling.
Ingredients You’ll Need
For the Crust
- 1 1/2 cups graham cracker crumbs (about 10 full sheets)
- 1/3 cup granulated sugar
- 6 tablespoons unsalted butter, melted
- 1/4 teaspoon kosher salt
Optional Flavor Additions
- 1/2 teaspoon ground cinnamon
- 1 teaspoon vanilla extract
- 1 tablespoon brown sugar
- 2 tablespoons finely chopped pecans
Optional Uses
- Cheesecake filling
- Chocolate cream pie filling
- Lemon pie filling
- No-bake pudding filling
- Fresh fruit filling
Pro Tips
- Crush the graham crackers into fine crumbs for the best texture. Large chunks can make the crust harder to slice neatly.
- Mix the crumbs and butter until the texture resembles wet sand. Every crumb should be lightly coated for the best hold.
- Press the crust firmly into the pan using the bottom of a measuring cup. This creates an even layer and helps prevent crumbling.
- Chill a no-bake crust before filling so it firms up properly. This step makes a big difference in stability.
- If baking, do not overbake. A short bake sets the crust while keeping the flavor buttery rather than too dark.
- Let the crust cool completely before adding chilled fillings. Warm crust can soften creamy fillings too quickly.
Tools You’ll Need
- Food processor or zip-top bag and rolling pin
- Mixing bowl
- Measuring cups
- Measuring spoons
- Rubber spatula or spoon
- 9-inch pie plate or springform pan
- Measuring cup or flat-bottom glass for pressing crust
- Oven mitts (if baking)
Substitutions and Variations
Graham crackers are classic, but digestive biscuits or vanilla wafers can also be used. Each creates a slightly different flavor while keeping the same easy method.
Chocolate graham crackers make an excellent crust for chocolate pies or cheesecake. They add deeper flavor with no extra effort.
Granulated sugar gives a clean sweetness, though brown sugar adds a richer caramel-like taste. Many bakers enjoy using half of each.
Unsalted butter is ideal because it gives control over saltiness, but salted butter can be used if that is what you have. Simply reduce or omit the added salt.
If you want a cinnamon-spiced crust, add ground cinnamon or pumpkin pie spice. This works especially well with cheesecake or fall desserts.
A little vanilla mixed into the butter can add warmth and extra aroma. It is a small touch that makes homemade crust feel special.
For nutty flavor, add finely chopped pecans, walnuts, or almonds. This can be especially delicious with cream pies or holiday desserts.
If you need a dairy-free option, use melted plant-based butter. Many varieties work well for crumb crusts.
For gluten-free desserts, use gluten-free graham crackers or gluten-free cookies. Always check labels carefully.
If the mixture seems too dry, add a little more melted butter one teaspoon at a time. Different crumb textures may absorb butter differently.
If it seems too wet, add a spoonful of extra crumbs. The final mixture should press together easily but not feel greasy.
Use this crust in pie plates, tart pans, muffin tins, or baking dishes for bars. It is highly adaptable to many dessert shapes.
Mini graham cracker crusts in muffin tins are perfect for parties and portioned desserts. They also bake quickly.
For cheesecake, pressing the crumbs slightly up the sides creates a classic bakery-style look. This works beautifully in a springform pan.
For no-bake pies, chilling the crust thoroughly before filling is especially important. This helps it hold slices better.
No matter how you adapt it, the buttery crumb texture is what makes this crust such a dependable dessert favorite.
Make Ahead Tips
Easy Graham Cracker Crust is one of the most helpful dessert basics to prepare ahead. You can make the crust up to 3 days in advance and keep it covered in the refrigerator until ready to fill. This is especially useful for holidays, parties, and busy baking days.
If you are baking the crust, let it cool completely before covering and refrigerating. A warm crust can trap moisture and soften the texture.
The crumb mixture can also be made ahead and stored separately. Keep it in an airtight container, then press it into the pan when needed.
For longer storage, the prepared crust can be frozen for up to 2 months. Wrap tightly and thaw in the refrigerator before filling.
Instructions
Step 1: Crush the Graham Crackers
Place the graham crackers in a food processor and pulse into fine crumbs. If using a zip-top bag, crush with a rolling pin until finely ground.
Step 2: Measure the Crumbs
Measure 1 1/2 cups of graham cracker crumbs and place them in a mixing bowl. Fine crumbs help create the most even crust.
Step 3: Add Dry Ingredients
Add the granulated sugar and salt to the bowl. Stir until evenly combined.
Step 4: Add Melted Butter
Pour in the melted butter. If using cinnamon or vanilla, add them now as well.
Step 5: Mix Until Combined
Stir with a spoon or spatula until all crumbs are moistened. The mixture should resemble wet sand and hold together when pressed.
Step 6: Prepare the Pan
Lightly grease a 9-inch pie plate or springform pan if desired. This can make slicing and serving easier.
Step 7: Press Into the Pan
Pour the crumb mixture into the pan. Use the bottom of a measuring cup or flat glass to press firmly across the bottom and up the sides if needed.
Step 8: Chill for No-Bake Use
For a no-bake crust, refrigerate for at least 1 hour until firm. Then fill as desired.
Step 9: Bake for Baked Use
For a baked crust, place in a 350°F oven for 8 to 10 minutes. The crust should look lightly golden and smell fragrant.
Step 10: Cool Completely
Remove from the oven and let cool fully before adding any filling. This helps maintain crisp texture.
Step 11: Fill and Serve
Add your chosen pie, cheesecake, or dessert filling. Slice and serve once fully set.
Serving Suggestions
Easy Graham Cracker Crust is perfect for classic cheesecake. Its buttery crunch pairs beautifully with creamy fillings.
Use it for chocolate cream pie or pudding pie for a nostalgic family dessert. The sweet crust complements rich chocolate very well.
Lemon pie fillings are another wonderful match. The bright citrus flavor balances the buttery crumbs nicely.
Fresh berry no-bake pies look especially beautiful in this crust. Strawberries, blueberries, or mixed berries all work well.
Use it as a base for mini cheesecakes in muffin tins for parties. Individual portions are always popular.
This crust also works in baking dishes for layered dessert bars. It is one of the most versatile dessert bases to keep in your recipe collection.
Leftovers and Storage
Store an unfilled graham cracker crust covered in the refrigerator for up to 3 days. Keep it tightly wrapped so it stays fresh.
A baked crust should be fully cooled before covering. This helps prevent trapped steam from softening the crumbs.
Filled pies or cheesecakes should be stored according to the filling recipe. Most cream-based desserts need refrigeration.
If the crust softens slightly after filling, chilling often helps it firm back up. Slice with a sharp knife for cleaner pieces.
Freeze an unfilled crust wrapped tightly for up to 2 months. Thaw overnight in the refrigerator before using.
Leftover slices of filled desserts should be stored in airtight containers whenever possible.
Nutrition and Benefits
- Homemade crusts allow better control over ingredients and sweetness.
- Simple pantry staples make this recipe budget-friendly and convenient.
- Portion size can be managed by using mini pans or smaller slices.
- A homemade crust often tastes fresher than many store-bought options.
- This recipe can be adapted for gluten-free or dairy-free needs.
- Making dessert bases from scratch builds useful baking confidence and skills.
Recipe FAQ
Can I make Easy Graham Cracker Crust without baking it?
Yes, absolutely. Simply chill the pressed crust for at least 1 hour until firm. This works well for no-bake pies and chilled cheesecakes.
Why is my graham cracker crust falling apart?
Usually the mixture needs more butter or firmer pressing into the pan. Make sure the crumbs are evenly moistened. Chilling also helps it hold together.
Can I use store-bought graham cracker crumbs?
Yes, store-bought crumbs are a great shortcut. Measure the same amount and continue with the recipe as written.
Should I bake the crust for cheesecake?
It depends on the cheesecake recipe. Many baked cheesecakes benefit from a briefly baked crust, while no-bake cheesecakes often use a chilled crust.
Can I freeze graham cracker crust?
Yes, an unfilled crust freezes very well. Wrap tightly and freeze for up to 2 months. Thaw in the refrigerator before filling.
What can I use instead of graham crackers?
Digestive biscuits, vanilla wafers, shortbread cookies, or chocolate wafers are all great alternatives. Adjust sweetness as needed.
How do I get clean slices?
Chill the finished dessert thoroughly and use a sharp knife. Wipe the knife clean between cuts for neat slices.
A Simple Baking Essential Worth Making Again
Easy Graham Cracker Crust is the kind of reliable recipe that makes homemade desserts feel effortless and special. With buttery crumbs and simple ingredients, it creates the perfect base for pies, cheesecakes, and sweet treats of all kinds.
Because it is quick to prepare, easy to customize, and useful for so many desserts, this recipe belongs in every home kitchen. Once you make it from scratch, it is sure to become a favorite worth making again.