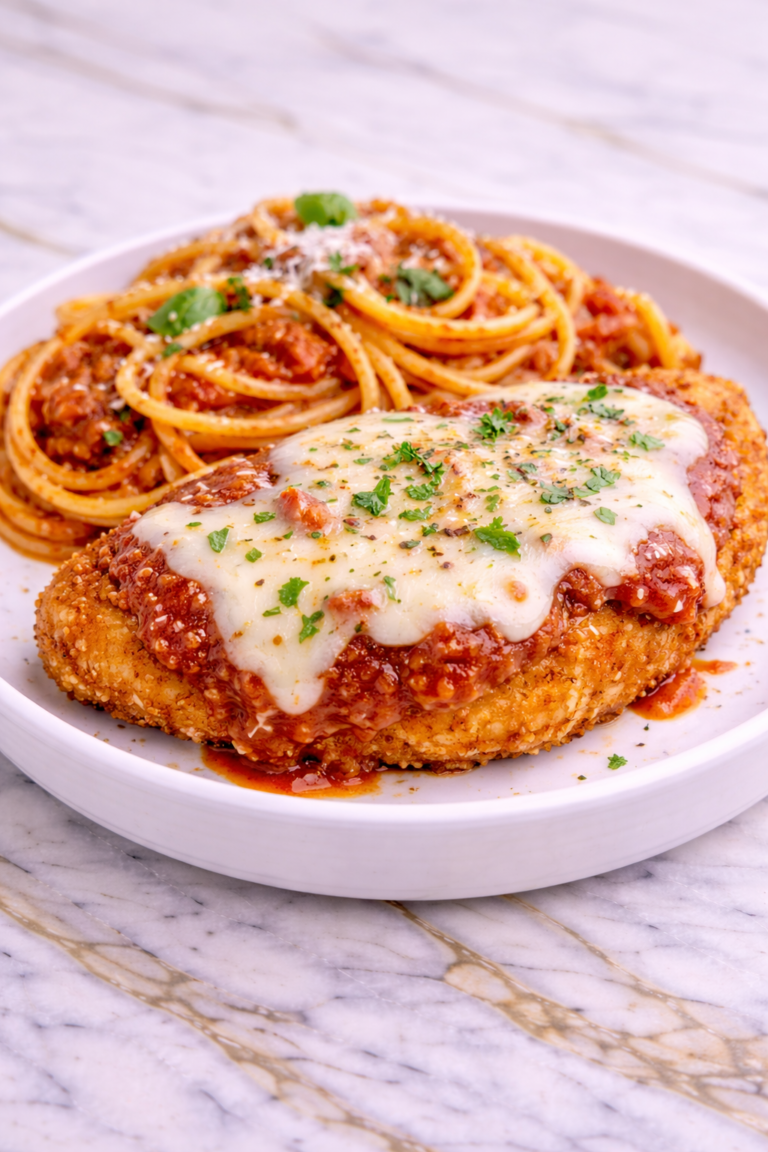
I first made baked ziti on a cold winter evening when I wanted something that felt deeply comforting and generous in the way Dom DeLuise always seemed to approach a meal.
That bubbling, cheesy pasta baked until golden on top with rich tomato sauce running through every layer is the kind of dish that makes everyone at the table feel genuinely taken care of.
A lot of homemade baked ziti recipes end up dry or missing that saucy, cheesy depth that makes it so hard to stop at just one serving.
This recipe walks you through every layer so yours comes out rich, cheesy, and completely satisfying from the very first bite.

Why You’ll Love This Recipe
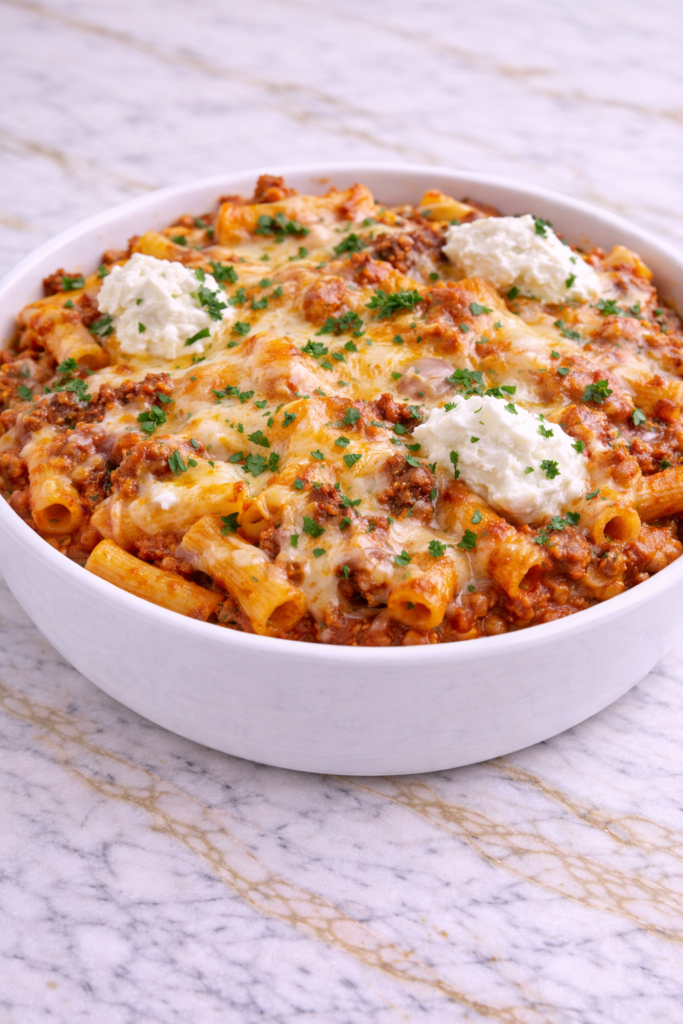
This Dom DeLuise inspired baked ziti is the ultimate comfort food. It combines pasta, sauce, and cheese into one warm, satisfying dish that’s perfect for any occasion. Every bite is rich, creamy, and full of flavor.
It’s also incredibly practical. You can prepare it ahead of time, customize it with your favorite ingredients, and easily serve a crowd. It’s a reliable go-to recipe that never disappoints.
Serves: 6–8 people
This recipe makes a generous portion, perfect for feeding a family or entertaining guests. It also reheats beautifully, making it great for leftovers.
What You’ll Need
- 12 oz ziti pasta
- 1 lb ground beef or Italian sausage
- 2 cups marinara sauce
- 1/2 cup ricotta cheese
- 2 cups shredded mozzarella cheese
- 1/2 cup grated Parmesan cheese
- 1 small onion, chopped
- 2 cloves garlic, minced
- 1 tbsp olive oil
- 1 tsp salt
- 1/2 tsp black pepper
- 1 tsp dried oregano
- 1 tsp dried basil
Pro Tips
Cook the pasta just until al dente. It will continue to cook in the oven, so slightly undercooking helps maintain the perfect texture.
Use a combination of cheeses for the best flavor and texture. Ricotta adds creaminess, mozzarella provides melt, and Parmesan adds a sharp finish.
Brown the meat properly before adding sauce. This builds a deeper, richer flavor base.
Layer the ingredients instead of mixing everything together. This creates a more structured dish with distinct textures.
Let the baked ziti rest for a few minutes after baking. This helps it set and makes it easier to serve.
Tools You’ll Need
- Large pot
- Skillet
- Baking dish
- Wooden spoon
- Knife
- Cutting board
Substitutions and Variations
You can use ground turkey or chicken for a lighter version. The flavor will be slightly different but still delicious.
For a vegetarian option, skip the meat and add vegetables like mushrooms, zucchini, or spinach. This keeps the dish hearty.
Use cottage cheese instead of ricotta if needed. It provides a similar texture with a slightly different flavor.
Add red pepper flakes for a bit of heat. This enhances the sauce without overpowering it.
You can also mix in cooked pasta with the sauce instead of layering for a simpler version.
Make Ahead Tips
This Dom DeLuise inspired baked ziti is one of those recipes that’s perfect for planning ahead. In fact, it’s often even better the next day after the flavors have had time to settle and deepen.
You can fully assemble the baked ziti up to 24 hours in advance. Simply cover the dish tightly with foil and store it in the refrigerator. When you’re ready to bake, remove it from the fridge and let it sit at room temperature for about 20–30 minutes before placing it in the oven. This helps it cook evenly.
If you want to prepare components separately, you can cook the pasta and make the meat sauce ahead of time, storing them in separate containers. When ready, just assemble and bake.
This dish also freezes beautifully. Assemble it in a freezer-safe dish, cover tightly, and freeze for up to three months. When ready to cook, thaw overnight in the refrigerator and bake as directed.
Instructions
Step 1: Cook the Pasta
Bring a large pot of salted water to a boil and cook the ziti until just al dente. Drain and set aside.
Step 2: Cook the Meat
In a skillet, heat olive oil over medium heat. Add ground beef or sausage and cook until browned, breaking it apart with a spoon.
Step 3: Add Onion and Garlic
Stir in the chopped onion and cook until softened, then add the minced garlic and cook for another minute.
Step 4: Add Sauce and Seasoning
Pour in the marinara sauce and add salt, pepper, oregano, and basil. Stir and let it simmer for 10–15 minutes.
Step 5: Preheat the Oven
Preheat your oven to 375°F. This prepares it for even baking.
Step 6: Assemble the Ziti
In a baking dish, layer cooked pasta, meat sauce, ricotta, mozzarella, and Parmesan. Repeat layers and finish with cheese on top.
Step 7: Bake the Dish
Cover with foil and bake for 20 minutes, then uncover and bake for another 10–15 minutes until the cheese is melted and bubbly.
Step 8: Rest and Serve
Remove from the oven and let it rest for a few minutes before serving. This helps it set and makes serving easier.
Serving Suggestions
This baked ziti is a complete and satisfying meal on its own, but pairing it with a few simple sides can elevate the experience even more. Garlic bread is a classic companion, perfect for scooping up extra sauce and adding a crunchy texture.
A fresh green salad with a light vinaigrette provides a refreshing contrast to the richness of the dish. The crisp vegetables help balance the creamy and cheesy elements.
You can also serve it with roasted vegetables like zucchini, broccoli, or asparagus for added nutrition and variety. These sides complement the flavors without overpowering them.
For a cozy dinner, pair it with a glass of your favorite beverage and a simple dessert like cookies or fruit to round out the meal.
Leftovers and Storage
Store leftover baked ziti in an airtight container in the refrigerator for up to four days. Allow it to cool completely before storing to maintain its texture.
To reheat, place it in an oven-safe dish and warm at 350°F until heated through. This helps preserve the cheesy texture better than microwaving.
If using a microwave, heat in short intervals and stir occasionally to ensure even warming.
You can freeze baked ziti for up to three months. Wrap it tightly or store in a freezer-safe container. Thaw overnight in the refrigerator before reheating.
For best flavor and texture, enjoy within a few days. Proper storage helps maintain its quality.
Nutrition and Benefits
- This dish provides a good balance of protein, carbohydrates, and fats, making it a filling and satisfying meal.
- Using high-quality ingredients enhances both flavor and nutritional value.
- Adding vegetables can increase fiber and vitamins, improving overall balance.
- Making it at home allows you to control ingredients and portion sizes.
- Adjusting cheese and meat quantities can help tailor the dish to your dietary needs.
Recipe FAQ
Can I make baked ziti without meat?
Yes, you can make a vegetarian version by adding vegetables or using plant-based alternatives.
Can I use a different type of pasta?
Absolutely. Penne or rigatoni work well as substitutes for ziti.
How do I keep the dish from drying out?
Make sure there is enough sauce and cover it أثناء the first part of baking. This helps retain moisture.
Can I prepare this dish ahead of time?
Yes, it’s perfect for making ahead and baking later. It also freezes well.
What cheese works best?
Mozzarella for melt, ricotta for creaminess, and Parmesan for flavor create the best combination.
Is this recipe kid-friendly?
Yes, the cheesy and mild flavors make it very appealing to kids.
How do I get a golden top?
Bake uncovered for the last portion of cooking to allow the cheese to brown slightly.
A Comfort Dish Worth Sharing Again and Again
Once you make baked ziti this way, it’s going to become the dish you bring to every gathering and the one everyone asks you to make again before the night is even over.
Those bubbling layers of cheesy, saucy pasta fresh out of the oven create something that feels like pure comfort food at its absolute best.
I love making a big pan of this on Sunday afternoons because it reheats beautifully throughout the week and somehow tastes even better the next day when all the flavors have had time to come together.
Generous, cheesy, and made with heart. I hope it becomes a beloved staple in your kitchen.