I have ordered the crispy chicken sandwich from Hardee’s more times than I can count, and there is something about that crunchy coating and soft, toasted bun that just hits the spot every single time.
Recreating that same experience at home always seemed like it would require more effort than it was worth, but the process turned out to be a lot more straightforward than I expected.
A lot of homemade versions miss that signature crunch that makes this sandwich worth craving in the first place. This recipe walks you through every detail so yours comes out just as crispy, juicy, and satisfying as the original.

Why You’ll Love This Recipe
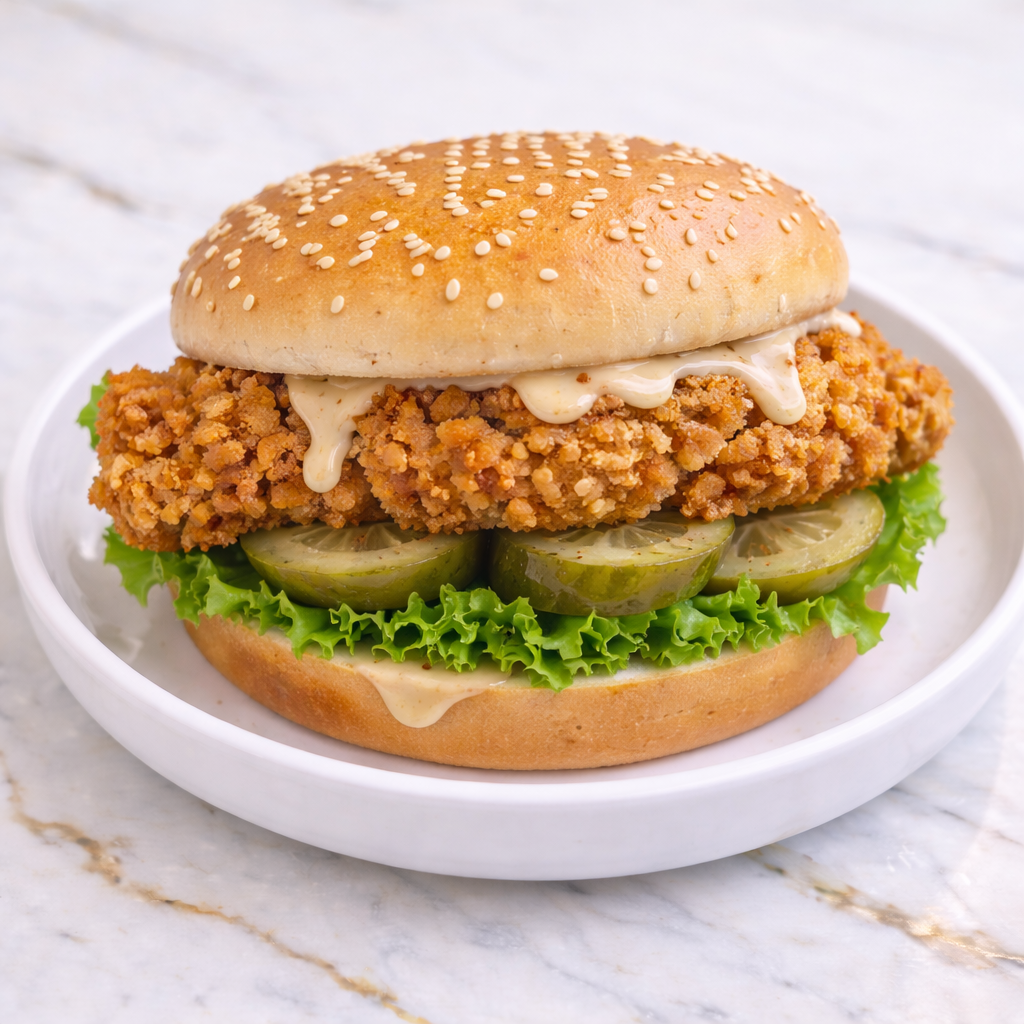
This Hardee’s Crispy Chicken Sandwich delivers that signature crunch with a juicy and flavorful interior. The seasoned coating creates a golden crust, while the simple toppings keep the focus on the chicken. It’s a satisfying and familiar flavor that’s easy to recreate at home.
Another reason to love this recipe is how customizable it is. You can adjust the seasoning, toppings, and sauces to suit your taste. It’s perfect for family meals, gatherings, or whenever you’re craving a classic fast-food sandwich.
Serves: 4 people
This recipe makes four sandwiches, making it ideal for a family meal. You can easily scale it up for larger groups. It’s simple and flexible.
Ingredients You’ll Need
For the Chicken:
- 4 boneless, skinless chicken breasts (pounded thin)
For the Marinade:
- 1 cup buttermilk
- 1 tsp salt
- 1/2 tsp black pepper
For the Coating:
- 1 1/2 cups all-purpose flour
- 1/2 cup cornstarch
- 1 tsp paprika
- 1 tsp garlic powder
- 1/2 tsp onion powder
- 1/2 tsp salt
- 1/4 tsp black pepper
For Assembly:
- 4 hamburger buns
- 1 cup shredded lettuce
- 1/2 cup mayonnaise
For Frying:
- Oil for frying
Pro Tips
Pound the chicken to an even thickness to ensure it cooks evenly. This helps avoid overcooking thinner parts. It also improves texture.
Marinate the chicken for at least 30 minutes to enhance flavor and tenderness. Longer marinating times can improve the result. It’s worth the wait.
Use a mix of flour and cornstarch for a crispier coating. This creates a light and crunchy texture. It’s key for achieving that classic crunch.
Make sure the oil is at the right temperature before frying. Too hot and the coating burns, too cool and it becomes greasy. Aim for around 350°F.
Do not overcrowd the pan when frying. Cook in batches if needed. This helps maintain oil temperature and ensures even cooking.
Toast the buns lightly before assembling the sandwich. This adds texture and prevents sogginess. It makes a noticeable difference.
Tools You’ll Need
- Mixing bowls
- Tongs
- Large skillet or deep fryer
- Wire rack
- Knife
- Cutting board
Substitutions and Variations
You can use chicken thighs instead of breasts for a juicier option. Thighs tend to stay more tender during cooking. It’s a great alternative.
If you don’t have buttermilk, mix milk with lemon juice or vinegar as a substitute. Let it sit for a few minutes before using. It works well.
For a baked or air-fried version, cook the chicken at 400°F until crispy and fully cooked. The texture will be slightly different but still delicious. It’s a lighter option.
Add spices like cayenne pepper for a spicy version. This gives the sandwich a bold kick. Adjust to your taste.
You can include additional toppings like pickles, tomatoes, or cheese. These add extra flavor and variety. It’s easy to customize.
Make Ahead Tips
This Hardee’s Crispy Chicken Sandwich is easy to prepare ahead of time, especially if you want to streamline your cooking process. You can marinate the chicken in buttermilk up to 24 hours in advance and keep it covered in the refrigerator. This allows the chicken to become more tender and flavorful.
The dry coating mixture can also be prepared ahead and stored in an airtight container. This makes the breading process faster when you’re ready to cook. Having everything measured and ready helps save time.
You can also wash and prepare toppings like lettuce or slice any additional ingredients ahead of time. Store them separately in the refrigerator until ready to assemble. This makes final assembly quick and easy.
For best results, fry the chicken fresh just before serving. This ensures the coating stays crispy and the sandwich has the best texture. A little preparation makes everything smoother.
Instructions
Step 1: Marinate the Chicken
In a bowl, combine buttermilk, salt, and black pepper. Add the chicken breasts and ensure they are fully coated. Cover and refrigerate for at least 30 minutes.
Step 2: Prepare the Coating
In a separate bowl, mix the flour, cornstarch, paprika, garlic powder, onion powder, salt, and black pepper. Stir until evenly combined. This creates a flavorful crust.
Step 3: Heat the Oil
Pour oil into a large skillet or deep fryer and heat to about 350°F. Use a thermometer if possible for accuracy. Proper temperature ensures crispiness.
Step 4: Bread the Chicken
Remove the chicken from the marinade and let excess drip off. Dredge each piece in the flour mixture, pressing firmly to coat. Make sure all sides are covered.
Step 5: Fry the Chicken
Carefully place the chicken into the hot oil and fry for about 5 to 6 minutes per side. Cook until golden brown and the internal temperature reaches 165°F. Avoid overcrowding.
Step 6: Drain the Chicken
Remove the chicken from the oil and place it on a wire rack. This helps excess oil drain while keeping the coating crisp. Let it rest briefly.
Step 7: Toast the Buns
Lightly toast the hamburger buns in a pan or oven until golden. This adds texture and prevents sogginess. Set aside.
Step 8: Assemble the Sandwich
Spread mayonnaise on the bottom bun, add the crispy chicken, and top with shredded lettuce. Place the top bun on and serve immediately.
Serving Suggestions
This sandwich pairs perfectly with classic sides like fries or potato wedges. The crispy textures complement each other well. It creates a satisfying meal.
Serve it with coleslaw for a refreshing contrast. The creamy and crunchy slaw balances the richness of the sandwich. It’s a great combination.
You can also pair it with a simple salad for a lighter option. The fresh greens help balance the flavors. It makes the meal feel more complete.
For a fun twist, serve with onion rings or seasoned fries. The extra crunch adds variety. It’s perfect for casual meals.
It also works well as part of a larger spread for gatherings. Serve with different sides and sauces for variety. It’s always a crowd favorite.
Leftovers and Storage
Store leftover fried chicken in an airtight container in the refrigerator for up to three days. Allow it to cool completely before storing. This helps maintain its texture.
To reheat, use an oven or air fryer to restore crispiness. Heat at a moderate temperature until warmed through. This works better than microwaving.
Avoid reheating in the microwave if possible, as it can make the coating soft. If needed, reheat in short intervals. This helps prevent overcooking.
Store buns and toppings separately to prevent sogginess. Assemble fresh for the best results. This keeps everything tasting better.
Freezing the cooked chicken is possible for up to two months. Thaw in the refrigerator before reheating. This helps maintain quality.
Nutrition and Benefits
- Chicken provides a good source of protein, helping support muscle health and keep you full. It makes the sandwich satisfying.
- Preparing this recipe at home allows you to control ingredients and portion sizes. This helps create a more balanced meal.
- Lettuce adds freshness and nutrients, helping balance the richness of the fried chicken. It improves the overall dish.
- Frying creates a crispy texture that enhances the eating experience. Moderation helps maintain balance.
- Pairing with lighter sides can help create a more well-rounded meal. Balance is key for enjoyment.
Recipe FAQ
Can I bake or air fry the chicken instead of frying?
Yes, you can cook it at 400°F until crispy and fully cooked. The texture will be slightly different but still good. It’s a lighter option.
How do I keep the coating crispy?
Place the chicken on a wire rack after frying and avoid stacking. This prevents steam from softening the coating. Proper handling helps.
Can I use chicken thighs instead of breasts?
Yes, chicken thighs are a great option and tend to be juicier. Adjust cooking time as needed. It’s a good variation.
What oil is best for frying?
Neutral oils like vegetable or canola oil work best. They have a high smoke point and don’t affect flavor. This ensures good results.
Can I add more toppings?
Yes, you can add pickles, tomatoes, or cheese. These additions enhance flavor. Customize to your preference.
Is this recipe kid-friendly?
Yes, the crispy texture and mild flavor make it appealing to kids. You can adjust seasoning if needed. It’s great for families.
How do I know when the chicken is done?
The internal temperature should reach 165°F. The outside should be golden and crispy. Proper cooking ensures safety.
A Crispy Sandwich Worth Making at Home
Once you make this at home, pulling up to a drive-through for a crispy chicken sandwich is going to feel like a step down from what you can put together in your own kitchen.
That golden, crunchy coating paired with the right toppings and a soft toasted bun creates a sandwich that holds up to anything you’d order at a fast food counter.
I love making these on weekends when I want something indulgent and satisfying without leaving the house. Simple technique, big flavor, and a result worth repeating every time the craving hits. I hope it becomes your new favorite homemade sandwich.