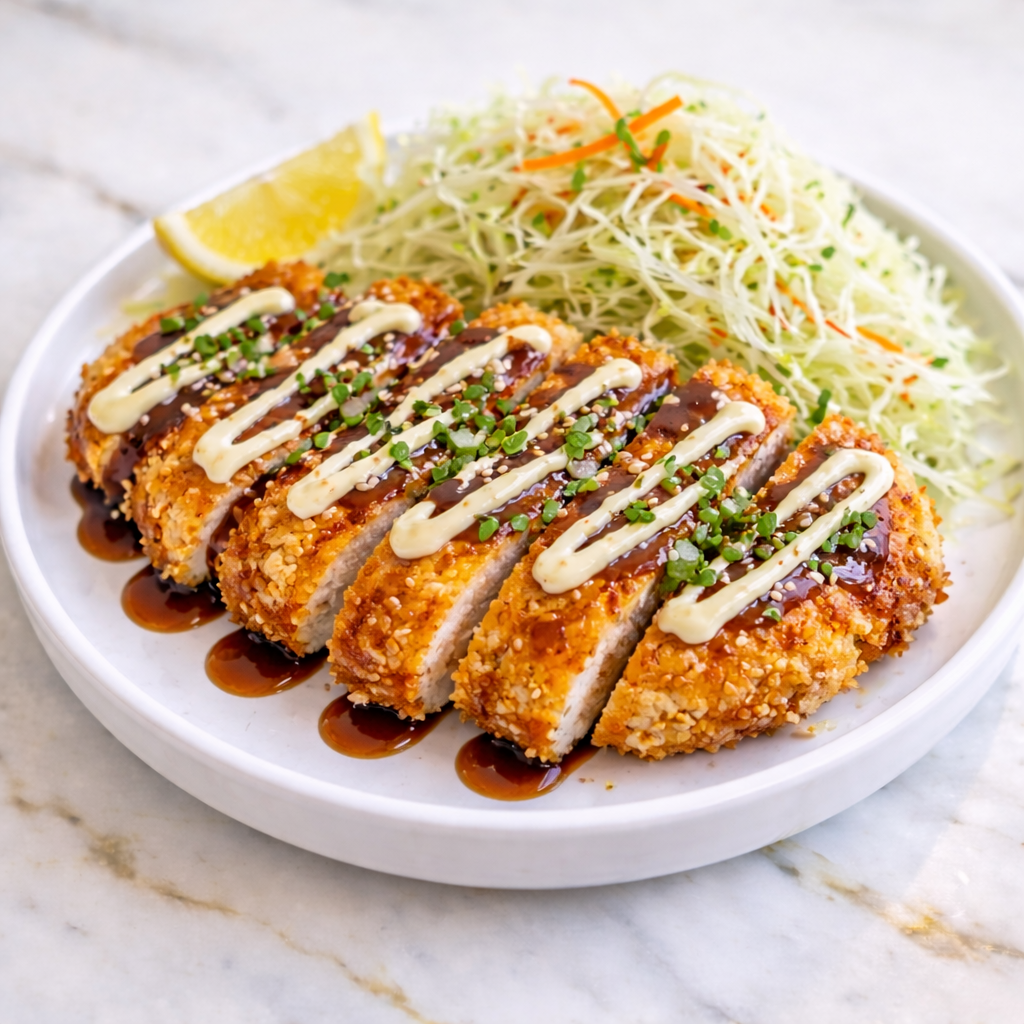
Chicken Katsu is one of those Japanese dishes that looks impressive on the plate but is actually very doable at home once you know the right approach.
That golden, shatteringly crispy panko crust with juicy chicken underneath is hard to resist, and pairing it with a creamy Kewpie sauce takes it even further.
A lot of people have tried katsu at restaurants but never considered making it in their own kitchen. I put this together at home and it came out crispy, tender, and full of flavor from the very first bite. This post walks you through every step so yours turns out just as good.

Why You’ll Love This Recipe
This Kewpie Chicken Katsu delivers a perfect balance of crispy texture and creamy flavor. The panko coating creates a light, crunchy crust while the chicken stays juicy inside. Paired with the smooth, tangy Kewpie sauce, every bite feels satisfying and well-rounded.
Another reason this recipe is so appealing is how approachable it is. With simple ingredients and straightforward steps, you can create a restaurant-style dish at home. It’s a great option for both beginners and experienced cooks.
Serves: 4 people
This recipe serves four as a main dish, with generous portions that pair well with a variety of sides. It can easily be scaled up or down depending on your needs. It’s also great for leftovers.
Ingredients You’ll Need
For the Chicken:
- 4 boneless, skinless chicken breasts
- 1/2 cup all-purpose flour
- 2 eggs, beaten
- 1 1/2 cups panko breadcrumbs
- 1 tsp salt
- 1/2 tsp black pepper
- Oil for frying
For the Sauce:
- 1/2 cup Kewpie mayonnaise
- 2 tbsp ketchup
- 1 tbsp Worcestershire sauce
- 1 tsp Dijon mustard
Optional Add-Ins:
- 1/2 tsp garlic powder
- 1/4 tsp paprika
- Shredded cabbage for serving
Pro Tips
Pound the chicken to an even thickness before breading to ensure even cooking. This helps prevent dry spots and keeps the meat tender. It also helps the chicken cook faster.
Use panko breadcrumbs instead of regular breadcrumbs for the crispiest texture. Panko creates a lighter and crunchier coating. It’s key to achieving that signature katsu crust.
Season each layer of the breading process to build flavor. Adding seasoning to the flour and eggs enhances the overall taste. This step makes a noticeable difference.
Press the breadcrumbs firmly onto the chicken to help them adhere. This ensures the coating stays intact during cooking. It also creates a more even crust.
Fry the chicken in oil heated to about 350°F for best results. Proper temperature helps the coating crisp without absorbing too much oil. It also ensures even cooking.
Let the cooked chicken rest for a few minutes before slicing. This helps retain juices and keeps the meat tender. It improves the final texture.
Tools You’ll Need
- Cutting board
- Sharp knife
- Meat mallet or rolling pin
- Shallow bowls (for breading)
- Large skillet or frying pan
- Tongs
- Paper towels
Substitutions and Variations
You can use chicken thighs instead of breasts for a juicier option. Thighs tend to stay more tender and flavorful. It’s a great alternative.
If you prefer a lighter version, you can bake or air-fry the chicken instead of frying. While the texture may differ slightly, it still turns out crispy. It’s a good option for less oil.
You can substitute regular mayonnaise if you don’t have Kewpie, adding a bit of lemon juice or rice vinegar. This helps mimic the tangy flavor. It’s an easy swap.
For a spicier sauce, add a bit of sriracha or chili paste. This creates a nice contrast to the creamy base. Adjust to your preference.
Serving the katsu with rice, salad, or noodles can turn it into a complete meal. These additions complement the dish well. It’s easy to customize.
Make Ahead Tips
This Kewpie Chicken Katsu can be partially prepared ahead of time, which makes it a great option for busy days or planned meals. You can bread the chicken up to a day in advance and store it covered in the refrigerator. This not only saves time but also helps the coating adhere better during cooking.
The sauce can be made ahead and stored in an airtight container in the refrigerator for up to three days. This allows the flavors to blend and develop more depth. Give it a quick stir before serving to bring everything back together.
If you want to prep further, you can cook the chicken ahead and reheat it in the oven or air fryer to restore crispiness. This works especially well for meal prep or entertaining. It helps you serve a fresh-tasting dish with less effort.
For best results, keep the sauce separate until serving. This ensures the chicken stays crispy and doesn’t become soggy. A little preparation goes a long way in making this recipe easy and stress-free.
Instructions
Step 1: Prepare the Chicken
Place the chicken breasts on a cutting board and pound them to an even thickness. Season both sides with salt and black pepper. This ensures even cooking and better flavor.
Step 2: Set Up Breading Station
Prepare three shallow bowls—one with flour, one with beaten eggs, and one with panko breadcrumbs. This setup makes the breading process smooth and organized. It helps create an even coating.
Step 3: Coat the Chicken
Dredge each piece of chicken in flour, then dip into the eggs, and finally coat with panko breadcrumbs. Press the breadcrumbs firmly to ensure they stick. Repeat for all pieces.
Step 4: Heat the Oil
Pour oil into a large skillet and heat to about 350°F over medium heat. The oil should be hot enough to sizzle when the chicken is added. Proper temperature is key for crispiness.
Step 5: Fry the Chicken
Carefully place the breaded chicken into the hot oil and cook for about 4 to 5 minutes per side. Cook until golden brown and fully cooked through. Avoid overcrowding the pan.
Step 6: Drain and Rest
Remove the chicken from the oil and place it on paper towels to drain excess oil. Let it rest for a few minutes before slicing. This helps maintain juiciness.
Step 7: Prepare the Sauce
In a small bowl, mix together Kewpie mayonnaise, ketchup, Worcestershire sauce, and Dijon mustard. Stir until smooth and well combined. Taste and adjust if needed.
Step 8: Slice and Serve
Slice the chicken into strips and serve with the prepared sauce drizzled on top or on the side. Add shredded cabbage if desired. Serve immediately while hot and crispy.
Serving Suggestions
This chicken katsu pairs perfectly with steamed white rice. The rice balances the crispy texture and creamy sauce. It creates a classic and satisfying meal.
Serve it alongside shredded cabbage or a simple salad for freshness. The crisp vegetables contrast nicely with the rich chicken. This adds balance to the plate.
You can also serve it with noodles for a more filling option. The sauce works well with simple noodle dishes. It’s a great way to switch things up.
For a casual meal, serve it as a sandwich or in a wrap. Add lettuce and extra sauce for flavor. It’s a fun and portable option.
It also works well as part of a larger spread with other sides or appetizers. This makes it great for gatherings. It’s always a crowd favorite.
Leftovers and Storage
Store leftover chicken katsu in an airtight container in the refrigerator for up to three days. Allow it to cool completely before storing. This helps maintain its texture.
To reheat, use an oven or air fryer to restore crispiness. Heat at a moderate temperature until warmed through. This works better than microwaving.
Avoid microwaving if possible, as it can make the coating soft. If you must use a microwave, reheat in short intervals. This helps prevent overcooking.
Store the sauce separately in the refrigerator for up to three days. Stir before using to maintain its smooth texture. Keeping it separate preserves quality.
Freezing is possible, but the texture may change slightly. For best results, freeze the cooked chicken without sauce and reheat before serving. This helps maintain crispiness.
Nutrition and Benefits
- Chicken provides a good source of lean protein, helping support muscle health and keep you full. It’s a satisfying base for the dish.
- Using panko breadcrumbs creates a lighter coating compared to traditional breadcrumbs. This helps keep the dish from feeling too heavy.
- Kewpie mayonnaise adds richness and flavor, enhancing the overall experience. Using it in moderation helps maintain balance.
- Making this recipe at home allows you to control ingredients and cooking methods. This helps create a more balanced meal.
- Pairing with vegetables or rice helps round out the dish nutritionally. This creates a more complete and satisfying meal.
Recipe FAQ
Can I bake this instead of frying?
Yes, you can bake the chicken at 400°F for about 20 to 25 minutes, flipping halfway. It won’t be quite as crispy but still delicious. It’s a good alternative.
How do I keep the coating from falling off?
Make sure to press the breadcrumbs firmly onto the chicken. Letting the breaded chicken rest for a few minutes before frying also helps. Proper technique is key.
Can I use chicken thighs instead of breasts?
Yes, chicken thighs work very well and tend to be juicier. Adjust cooking time slightly as needed. They add extra flavor.
What oil is best for frying?
Neutral oils like vegetable or canola oil are best. They have a high smoke point and don’t affect the flavor. This ensures the best results.
Can I make the sauce spicier?
Yes, add sriracha or chili paste to increase the heat. This pairs well with the creamy base. Adjust to taste.
Is this recipe kid-friendly?
Yes, especially if you keep the sauce mild. The crispy texture is usually a hit with kids. It’s easy to adjust flavors.
What can I serve with chicken katsu?
Rice, salad, noodles, or vegetables all work well. These sides complement the dish nicely. Choose based on your preference.
A Crispy Classic with a Creamy Twist
Once you make Chicken Katsu at home, it’s going to earn a permanent spot in your dinner rotation without any debate.
That crispy panko crust paired with the rich, creamy Kewpie sauce creates a combination that feels restaurant quality without the price tag or the wait.
I love making this on nights when I want something that looks and tastes impressive but doesn’t require hours of prep or complicated techniques.
It comes together smoothly and always delivers on the plate. Crispy on the outside, juicy on the inside, and finished with a sauce worth savoring. I hope it becomes one of your favorite dinners to make at home.